Real Homemade Canadian Butter Tarts

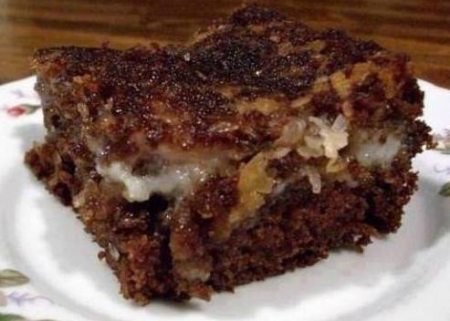
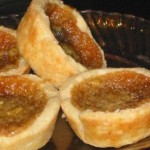
Melt in your mouth Real Homemade Canadian Butter Tarts, oh sooo good!! The method for baking is unusual but will prevent the filling from boiling over.

Whether you make your own pastry or use frozen tart shells from the grocery your friends and family will love these Homemade Canadian Butter Tarts!

This recipe should give somewhere between 3 and 4 dozen tarts depending on how full you fill the shells and how big your tart tins are.

Be sure to Follow Foodgasm Recipes on Pinterest for more great recipes!

Real Homemade Canadian Butter Tarts
Prep Time
15 mins
Cook Time
30 mins
Total Time
45 mins
 

My friend in Calgary shared this recipe with me.

Course: Dessert
Cuisine: Canadian
Keyword: Homemade Canadian Butter Tarts
Servings: 6
Calories: 295 kcal
Ingredients
  • 1 cup butter melted
  • 3 Tbsp vinegar
  • 4 eggs lightly beaten
  • 4 cups brown sugar
  • 2 tsp vanilla
  • 1/4 cup raisins (optional)
Instructions
  1. Line tart tins with pastry. Sprinkle 6-8 raisins into each tart shell.
  2. Let butter cool to room temp, then add the remaining ingredients. Stir until smooth.
  3. Spoon into unbaked tart shells, filling about 2/3 full.

  4. Bake at 200F for 15 min, then without taking the tarts out, turn the oven to 350°F
  5. Bake another 10-15 min, until they start to brown. This method will prevent them from boiling over.
  6. Note: I use Tender flake lard and make the pastry using the instructions on the box, chilling the dough before rolling. Roll it a little thicker than for pie pastry, and use a little extra flour.
  7. Alternatively you can use frozen tart shells from the grocery.

Enjoy!

Up Next: 

Caramel Apple Cheesecake Bars

Be sure to Follow Foodgasm Recipes on Pinterest for more great recipes!

German Chocolate Upside Down Cake

This German Chocolate Upside Down Cake is a German chocolate cake that is both quicker and easier than the traditional right-side-up cake.


This cake is wonderful. One thing; the presentation isn’t that great. But if you don’t try it because of that, you are missing out on a wonderful cake.

It is very rich and tasty. German chocolate cake isn’t supposed to be really heavy on the chocolate. This one is just right.

Be sure to Follow Foodgasm Recipes on Pinterest for more great recipes!

German Chocolate Upside Down Cake
Prep Time
25 mins
Cook Time
45 mins
Cooling
20 mins
Total Time
1 hr 30 mins
 

A much better cake than the right side up version.

Course: Dessert
Cuisine: American
Keyword: German Chocolate Upside Down Cake
Servings: 6
Calories: 425 kcal
Ingredients
  • 1 cup sweetened flaked coconut
  • 1 cup pecans, finely chopped
  • 3 1/2 cups powdered sugar
  • 1 cup margarine melted
  • 8 ounces cream cheese softened
  • 1 18 ounce box German chocolate cake mix with pudding
  • 1 1/3 cups water
  • 1/3 cup oil
  • 3 eggs
Instructions
  1. Preheat oven to 375°F Grease and flour 13x9 inch pan. Sprinkle coconut and pecans evenly over the bottom of the pan and set aside.

  2. In a large mixing bowl, mix cake mix, water, oil and eggs as directed on the box. Carefully pour batter over coconut and pecans in prepared pan.

  3. Mix melted margarine, cream cheese, and powdered sugar in large bowl on low speed for 30 seconds, or until well mixed. Increase mixer speed to medium and beat 30 seconds more, or until smooth.

  4. Spoon cream cheese over batter, leaving a 1-inch border of batter around the sides of the pan, and smooth with a spatula.

  5. Bake for 43-48 minutes, or until the cream cheese mixture has turned golden brown and the cake springs back when touched lightly.

  6. Remove from the oven and let cool for 20 minutes. Run a sharp knife around the edge of the cake and invert it onto a serving platter. Let rest for 20 minutes more, then slice and serve.


Enjoy!

Up Next: 

Caramel Apple Cheesecake Bars

Be sure to Follow Foodgasm Recipes on Pinterest for more great recipes!

Saltine Candy Toffee – Easy To Make & Delicious!

Saltine Candy Toffee is unusual but absolutely fantastic! Don’t let the thought of saltine crackers turn you away. These are delicious!


When I was just a little fellow I was playing at a friend’s house. His mother brought us a snack of saltine crackers. But it was more than just plain crackers.

I asked my friend what was on the cracker and he said “butter”. His Mom had spread butter on the crackers and toasted them in the oven.

I never forgot that snack and have made it many times over the years. Now I’ve discovered an even better snack featuring saltines.

Be sure to Follow Foodgasm Recipes on Pinterest for more great recipes!

Saltine Candy Toffee
Prep Time
10 mins
Cook Time
15 mins
Total Time
25 mins
 

Don't let the fact that this dish is made from saltines fool you. Delicious!

Course: Snack
Cuisine: American
Keyword: Saltine Candy Toffee
Servings: 6
Calories: 295 kcal
Ingredients
  • 1 cup butter (not margarine)
  • 1 cup light brown sugar
  • 1 11 ounce pkg chocolate chips (1 1/2 cups)
  • 40 saltine crackers
  • 1 cup chopped pecans
  • nonstick cooking spray
Instructions
  1. Line jellyroll pan with foil and spray with non-stick spray. Lay crackers out flat on foil.

  2. Melt sugar and butter until foamy (3 minutes). Pour over crackers and spread to coat.

  3. Bake 10 minutes in 350ºF oven. Remove from the oven.

  4. While hot, sprinkle with chocolate chips, let soften and melt, then spread. Sprinkle with nuts.

  5. Let cool and then refrigerate until hardened.

  6. Break into pieces like peanut brittle.


Enjoy this Saltine Candy Toffee recipe!

Up Next:

Cinnamon Pecans

Be sure to Follow Foodgasm Recipes on Pinterest for more great recipes!

Monkey Bread – Fun To Make & Delicious

The fun of Monkey Bread is pulling off biscuits to eat. These are just plain fun and so yummy, flaky, sweet, and nutty. Absolutely delicious!


This is a great recipe to make with kids because they can do the majority of the preparation and it’s a lot of fun.

However, most recently, this was a hit at an adult party. We couldn’t stop eating it!

A great treat at any time of day.

Be sure to Follow Foodgasm Recipes on Pinterest for more great recipes!

Monkey Bread
Prep Time
25 mins
Cook Time
30 mins
Cooling
10 mins
Total Time
1 hr 5 mins
 

Easy to make, delicious and so much fun for the kiddies!

Course: Dessert
Cuisine: American
Keyword: Monkey Bread
Servings: 6
Calories: 365 kcal
Ingredients
  • 1/2 cup granulated sugar
  • 1 teaspoon cinnamon
  • 2 cans 16.3 oz each refrigerated buttermilk biscuits
  • 1/2 cup chopped walnuts if desired
  • 1/2 cup raisins if desired
  • 1 cup firmly packed brown sugar
  • 3/4 cup butter or margarine melted
Instructions
  1. Heat oven to 350°F.
  2. Lightly grease 12-cup fluted tube pan with shortening or cooking spray.
  3. In large -storage plastic food bag, mix granulated sugar and cinnamon.
  4. Separate dough into 16 biscuits; cut each into quarters. Shake in bag to coat. Arrange in pan, adding walnuts and raisins among the biscuit pieces.
  5. In a small bowl, mix brown sugar and butter; pour over biscuit pieces.
  6. Bake 28 to 32 minutes or until golden brown and no longer doughy in center. Cool in pan 10 minutes.
  7. Turn upside down onto serving plate; pull apart to serve. Serve warm.


Enjoy!

Up Next:

Caramel Apple Cheesecake Bars

Be sure to Follow Foodgasm Recipes on Pinterest for more great recipes!

Microwave Peanut Brittle – Easy Peasy

This Microwave Peanut Brittle is absolutely the best peanut brittle recipe ever! Talk about easy and fast. This will now replace the tried and true recipe that I have used for years.


If you didn’t know better and took a bite of this peanut brittle you would swear it was made the old fashioned way. It’s got that special combination of light, airy, crunchy, and sweet.

But this is not old fashioned peanut brittle. This peanut brittle is ready in 10 minutes and with not a candy thermometer in sight. It’s cooked in the microwave.

This recipe allows you to satisfy your Peanut Brittle craving in just a few minutes! Perfect for a quick gift or to add to your holiday goodie tray.

The secret to microwave peanut brittle is intervals. Ingredients are added in stages so nothing that can burn gets burned!

Once you’ve successfully cooked your brittle until lightly golden and fragrant, just pour it onto a lined cookie sheet and cool. Break into chunks and devour.

Leftovers (if there are any) can be stored in an airtight container at room temperature.

This really is a no-fail recipe, and you never even have to use a candy thermometer, yay!

It’s fun, it’s easy and it’s delicious. Make it now.

Be sure to Follow Foodgasm Recipes on Pinterest for more great recipes!

Easy Peasy Microwave Peanut Brittle
Prep Time
5 mins
Cook Time
10 mins
Total Time
15 mins
 

Quick and easy peanut brittle with that old fashioned peanut brittle taste and texture!

Course: Dessert
Cuisine: American
Keyword: Microwave Peanut Brittle
Servings: 4
Calories: 395 kcal
Ingredients
  • 1 cup white sugar
  • 1/2 cup light corn syrup
  • 1 cup salted peanuts
  • 1 teaspoon butter
  • 1 teaspoon vanilla extract
  • 1 teaspoon baking soda
Instructions
  1. Butter a cookie sheet. Combine sugar and corn syrup in a 2 quart glass bowl and microwave on high 4 minutes. Stir in peanuts and microwave on high 3 1/2 minutes more, then stir in butter and vanilla and microwave for 1 1/2 minutes.
  2. Stir in baking soda until light and foamy. Pour onto cookie sheet and spread thin.
  3. Cool completely and break into pieces and serve or bag up for later.

Tips and Tidbits About Microwave Peanut Brittle

I’m sure you noticed that the recipe calls for roasted, salted peanuts. Just making the brittle doesn’t give the peanuts time to cook.

If all you have is raw peanuts, not to worry. Just place them on a baking sheet, sprinkle with a little oil and salt, and bake in the oven for about five to ten minutes.

Peanut brittle is not all you can make with this same recipe. You can use almost any kind of nut you like. Peanuts are my favorite though.

If you’ve got the time and want to make a really decadent dish melt some chocolate and dip pieces of brittle in it. Delish!

Whatever you chose to do I hope you enjoy this Microwave Peanut Brittle Recipe!

Up Next: 

Disneyland Snickerdoodles

Be sure to Follow Foodgasm Recipes on Pinterest for more great recipes!

No-Bake Peanut Butter Pie

This No-Bake Peanut Butter Pie is a real crowd-pleaser. It’s the pie for those times when you don’t really have time to make a pie!


Creamy and delicious and absolutely melts in your mouth.

Phenomenal! Warning: only if you love peanut butter though!

Fabulous! If you love peanut butter like me you’ll LOVE this. I couldn’t wait for it to freeze,

I sneaked some of the soft stuff and it’s so good!

You can also make it with lite cool whip, reduced-fat peanut butter, skim milk and fat-free cream cheese!

Be sure to Follow Foodgasm Recipes on Pinterest for more great recipes!

No-Bake Peanut Butter Pie
Prep Time
30 mins
Cook Time
0 mins
Total Time
30 mins
 

A no-bake pie recipe that the whole family will love. Especially the kiddos!

Course: Dessert
Cuisine: American
Keyword: no-bake peanut butter pie
Servings: 6
Calories: 395 kcal
Ingredients
  • 1 1/4 cups graham cracker crumbs
  • 1/4 cup melted butter...
  • 1 cup peanut butter
  • 4 ounces bakers white chocolate
  • 1 3 1/2 ounce package Jello Instant Vanilla Pudding Mix
  • 1 1/2 cups milk
  • 1 cup thawed Cool Whip Topping
  • 1 sliced banana
Instructions
  1. Combine the 1 1/4 cup graham cracker crumbs with 1/4 cup melted butter. Press into the bottom and side of the pie plate.

  2. Melt 1 cup peanut butter and 4 squares chopped Bakers white chocolate on medium in microwave for 2 1/2 minutes. Stir until smooth.

  3. Whisk 1 package {4 serving size} Jell-o vanilla instant pudding with 1 1/2 cups milk. Beat in chocolate mixture.

  4. Fold in 1 cup thawed Cool Whip Whipped Topping. Place 1 sliced banana on the bottom of the crust and spoon pudding on top. Freeze 1 hour.

  5. Garnish with the Cool Whip topping.


Enjoy!

Up Next:

Caramel Apple Cheesecake Bars

Be sure to Follow Foodgasm Recipes on Pinterest for more great recipes!

Quick and Easy Ham Tetrazinni

This Quick and Easy Ham Tetrazinni really is quick and ideal for family weeknight meals. As quick as the pasta cooks the dish is ready.


Add a salad and some crusty bread and you’re good to go!

Believe it or not, tetrazzini is not an Italian dish. It was created in the U.S.

Tetrazzini is often identified by the protein component; like turkey tetrazzini or chicken tetrazzini or in this case ham tetrazzini.

It’s like Cajun gumbo in that respect. Anything can be made into gumbo and anything can be made into a tetrazzini!

This version uses cooked diced ham and the sauce is mixed in with the pasta instead of being served over the top.

Be sure to Follow Foodgasm Recipes on Pinterest for more great recipes!

Quick and Easy Ham Tetrazzini
Prep Time
10 mins
Cook Time
10 mins
Total Time
20 mins
 

This really is a quick and easy meal.

Course: Main Course
Cuisine: Italian
Keyword: Quick and Easy Ham Tetrazzini
Servings: 4
Calories: 395 kcal
Ingredients
  • 6 ounces spaghetti
  • 3 quarts water
  • 1 teaspoon salt
  • 1 tablespoon butter
  • 2 tablespoons chopped onion
  • 1 10.75 ounce can condensed cream of mushroom soup
  • 1/2 cup water
  • 1/2 cup shredded Cheddar cheese
  • 1 cup diced ham
  • 2 tablespoons chopped fresh parsley
  • 2 tablespoons chopped pimento peppers
Instructions
  1. Bring a large pot of lightly salted water to a boil. Add spaghetti and cook for 8 to 10 minutes or until al dente; drain.
  2. While pasta is cooking, melt butter in a saucepan over medium heat. Stir in onion; cook and stir until the onion has softened and turned translucent about 5 minutes.
  3. Stir in cream of mushroom soup, 1/2 cup water, and shredded cheese. Heat mixture until cheese melts, stirring often.
  4. Mix in the ham, cooked and drained pasta, chopped pimento, and chopped parsley to saucepan; stir to combine. Cook until mixture is heated through, then serve.


Enjoy!

Up Next:

No-Bake Peanut Butter Pie

Be sure to Follow Foodgasm Recipes on Pinterest for more great recipes!

Mexican Stuffed Shells – Tex/Mex Deluxe

These Mexican stuffed shells would probably not be recognized in Mexico but in Texas, it’s just the sort of thing that you could expect.


When I was a youngster my family moved from Alabama to Texas. I developed a love for Tex/Mex food there and even though I live in Alabama now my love still lives.

They are really economical too. One pound of ground beef is stretched to serve 6 very generous servings or eight with a side and a salad.

I like to have refried beans and a simple lettuce and tomato salad along with some tortillas.

Be sure to Follow Foodgasm Recipes on Pinterest for more great recipes!

Mexican Stuffed Shells
Prep Time
15 mins
Cook Time
55 mins
Total Time
1 hr 10 mins
 

A delicious Tex/Mex meal that you won't soon forget!

Course: Main Course
Cuisine: Mexican
Keyword: Mexican Stuffed Shells
Servings: 6
Calories: 395 kcal
Ingredients
  • 1 lb ground beef
  • 1 1 1/4 ounce package taco seasoning (can use low-sodium)
  • 1 4 ounce package cream cheese
  • 14 -16 large pasta shells
  • 1 cup salsa
  • 1 cup taco sauce
  • 1 cup cheddar cheese shredded
  • 1 cup Monterey jack cheese shredded
  • 1 1/2 cups tortilla chips crushed (optional)
  • 3 green onions chopped
  • 1 cup sour cream
Instructions
  1. Preheat oven to 350°.
  2. In a frying pan cook ground beef; add taco seasoning and prepare according to package directions. Add cream cheese, cover, and then simmer until cheese is melted. Blend well. Set aside and cool completely.
  3. While the ground beef is cooking, cook the pasta shells according to directions; drain. Set shells out individually on a baking sheet so that they don’t stick together.
  4. Pour salsa on the bottom of a 9×13 inch baking dish. Stuff each shell with the meat mixture placing shells in dish open side up. Cover shells with taco sauce. Cover with foil and bake for 30 minutes.
  5. After 30 minutes, add shredded cheese and bake for 10-15 more minutes, with the foil removed. Top with green onions and serve with sour cream and/or more salsa.


Enjoy!

Up Next: 

Chicken Enchilada Casserole

Be sure to Follow Foodgasm Recipes on Pinterest for more great recipes!

Oven-Baked Cajun French Fries

Oven-Baked Cajun French Fries? If you want me to try a recipe just put Cajun in the title. The second best is oven-baked.


The Cajun seasoning recipe included here is good for all Cajun dishes. I’m thinking Red Beans and Rice is in my near future with this seasoning mix!

If your family is into French fries give this oven-baked version a try. It’s definitely healthier than frying and downright delicious!

Be sure to Follow Foodgasm Recipes on Pinterest for more great recipes!

Oven-Baked Cajun French Fries
Prep Time
20 mins
Cook Time
25 mins
Soaking
10 mins
Total Time
55 mins
 

If you want me to try something just put Cajun in the name!

Course: Side Dish
Cuisine: American
Keyword: Oven-Baked Cajun French Fries
Servings: 6
Calories: 295 kcal
Ingredients
  • 3 large russet potatoes
  • 1 1/2 T. olive oil
  • 1 T. Cajun seasoning recipe below
  • a good pinch of salt...
Cajun Seasoning
  • 2 1/2 T. smoked paprika
  • 2 T. garlic powder
  • 2 T. salt
  • 1 T. cayenne pepper
  • 1 T. black pepper
  • 1 T. onion powder
  • 1 T. thyme
  • 1 T. oregano
Instructions
  1. Combine all the spices and store in an airtight container.
  2. Wash and dry the potatoes, leaving the skin on, slice into even strips.
  3. Place the potatoes in a bowl and cover with cold water, allow to sit for 10 minutes.
  4. Drain the potatoes and pat dry. Add 1 T. olive oil, Cajun seasoning, and the salt to the potatoes. Toss to coat well.
  5. Grease the bottom of a large baking sheet with the remaining olive oil. Sprinkle just a little more Cajun seasoning over the bottom of the baking sheet.
  6. Place the potatoes on the baking pan in a single layer. Cover with tinfoil and bake in a 450-degree oven for 10 minutes, remove the tinfoil and continue to bake for an additional 15 minutes, stirring about 1/2 way through the cooking time.


Enjoy!

Up Next:

Seared Cajun Shrimp with Creamy Lemon Butter Sauce

Be sure to Follow Foodgasm Recipes on Pinterest for more great recipes!

Crock-Pot Swedish Cabbage Rolls

These Crock-Pot Swedish Cabbage Rolls are the best! Cabbage leaves stuffed with ground beef, onion, and rice, covered in a sweet and tangy tomato sauce.


Then they are cooked up in the crock-pot!

There’s more to this comfort food than meets the eye. Not only are these cabbage rolls comforting but they are delicious as well.

Plump parcels of melt-in your mouth cabbage, stuffed with a flavorful meaty filling brought together by a sauce that harmonizes rather than competes with the various elements.

The variety in texture and flavor keeps your mouth interested, bite-after-bite, until all that’s left is a few smears of errant sauce on your plate.

Be sure to Follow Foodgasm Recipes on Pinterest for more great recipes!

Crock-Pot Swedish Cabbage Rolls
Prep Time
30 mins
Cook Time
9 hrs
Total Time
9 hrs 30 mins
 

Delicious cabbage rolls. Easy to throw together and cooked in the crock-pot.

Course: Main Course
Cuisine: Swedish
Keyword: Crock-Pot Swedish Cabbage Rolls
Servings: 6
Calories: 425 kcal
Ingredients
  • 12 leaves savoy cabbage
  • 1 egg beaten
  • 1/4 cup tomato sauce
  • 1/4 cup finely chopped onion
  • 1 teaspoon salt
  • 1/4 teaspoon pepper
  • 1 lb lean ground beef
  • 1 cup cooked rice
  • 1 8 ounce cans tomato sauce
  • 1 tablespoon brown sugar
  • 1 tablespoon lemon juice
  • 1 teaspoon Worcestershire sauce
Instructions
  1. Immerse cabbage leaves in a large kettle of boiling water for about 3 minutes or until limp; drain.

  2. Combine egg, 1/4 cup of sauce, onion, salt, pepper, beef, and cooked rice. Place about 1/4 cup meat mixture in center of each leaf; fold in sides and roll ends over meat. Place in slow-cooking pot.
  3. Combine tomato sauce with brown sugar, lemon juice, and Worcestershire sauce. Pour over cabbage rolls.
  4. Cover and cook on low 7-9 hours.


Enjoy these Crock-Pot Swedish Cabbage Rolls!

Up Next:

Unstuffed Cabbage Rolls

Be sure to Follow Foodgasm Recipes on Pinterest for more great recipes!