Olive Mozzarella Chicken Bake

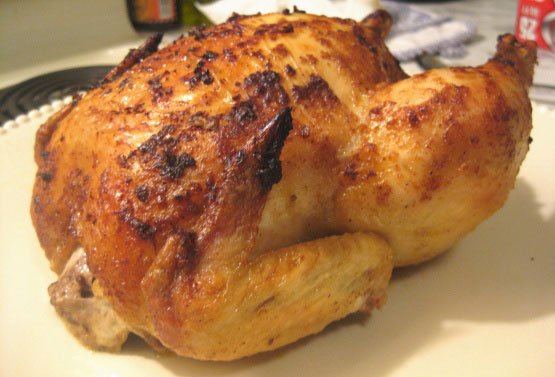
This Olive Mozzarella Chicken Bake is a brilliant recipe that really elevates everyday ingredients. It is so flavorful; my whole family loves it.


We also loved the smell of it long before we even took a bite! Oh so yummy!

I have even made this using skin-on chicken thighs. It’s still wonderful, just make the same as directed only bake a bit longer. You will love this!

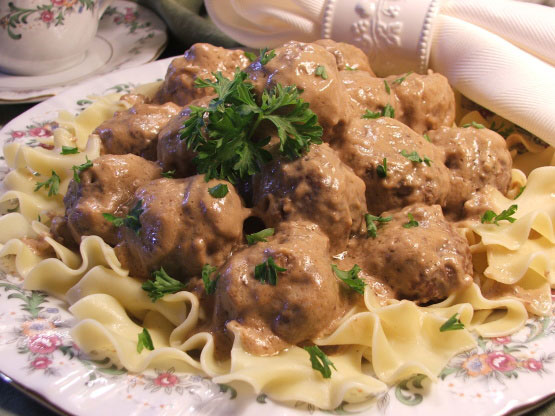
I served it over angel hair pasta with garlic toast on the side. I can’t wait to have the leftovers for lunch tomorrow. It is so tasty!

Be sure to Follow Foodgasm Recipes on Pinterest for more great recipes!

Olive Mozzarella Chicken Bake
Prep Time
20 mins
Cook Time
40 mins
Total Time
1 hr
 

This Olive Mozzarella Chicken Bake is so easy to make and a great family dinner.

Course: Main Course
Cuisine: American
Keyword: Olive Mozzarella Chicken Bake
Servings: 6
Calories: 395 kcal
Ingredients
  • 1/3 cup flour
  • 1/2 teaspoon salt I use seasoned salt
  • 1/4 teaspoon ground pepper
  • 1/4 cup olive oil
  • 2 tablespoons butter
  • 6 boneless chicken breasts cut into large pieces
  • 1 -2 tablespoon fresh minced garlic or to taste
  • 1 medium onion chopped
  • 1 8 ounce can sliced mushrooms
  • 2 cups pasta sauce home-made or one 14-ounce jar store-bought
  • 1/2 - 3/4 cup sliced pimento stuffed olive
  • 6 ounces sliced mozzarella cheese
Instructions
  1. Set oven to 350 degrees.
  2. In a plastic bag, combine flour, salt and pepper and coat the chicken pieces (shake off any excess flour).
  3. In a fry pan heat the olive oil with butter. Brown the coated chicken pieces on all sides. Place into prepared 2-quart shallow baking dish.
  4. In the same fry pan, saute the onion and garlic in the same drippings until tender. Stir in mushrooms, pasta sauce and olives; bring to a simmer for 5-6 minutes, stirring with a wooden spoon occasionally.
  5. Pour the sauce mixture over the chicken pieces. Top with mozza cheese.
  6. Bake for about 30 minutes, or until chicken is done.


Enjoy!

Up Next:

Smoky Chicken Chorizo Mexican Enchilada Baked Casserole

Be sure to Follow Foodgasm Recipes on Pinterest for more great recipes!

Recipe based on one by Kittencal
Photo by Kittencal

Chicken Teriyaki with Cashew Pineapple Rice

This Chicken Teriyaki with Cashew Pineapple Rice is a great recipe. The family loved this one hands down. The rice rated a *wow*! Great flavors.


I love that you can add all of the veggies you want. That makes this a great “meat stretcher” recipe!

I stir-fried a bag of oriental veggies to go along with it and we had a great meal!

One of my favorite meals. So much flavor, so little work!

Be sure to Follow Foodgasm Recipes on Pinterest for more great recipes!

Chicken Teriyaki with Cashew Pineapple Rice
Prep Time
15 mins
Cook Time
25 mins
Total Time
40 mins
 

This delicious chicken recipe does not disappoint.

Course: Main Course
Cuisine: Chinese
Keyword: Chicken Teriyaki with Cashew Pineapple Rice
Servings: 4
Calories: 365 kcal
Ingredients
  • 1 cup teriyaki sauce
  • 3/4 cup pineapple juice
  • 1/2 cup brown sugar
  • 1/2 cup vinegar
  • 1 teaspoon garlic powder
  • 1/4 cup Worcestershire sauce
  • 1/2 cup Italian salad dressing I use fat free
  • 1 -1 1/2 pounds boneless chicken breast
  • cooked rice 4 servings
  • 1 4 ounce can crushed pineapple
  • 3/4 cup cashew pieces
  • various cooked vegetables your choice
Instructions
  1. Mix the first 7 ingredients and bring to a boil. Cool; divide in half.
  2. Use half to marinade 1-1 1/2 pounds boneless chicken breast or chicken breast tenders over night.
  3. Refrigerate other half to be used later.
  4. Prepare white rice for 4 people, as instructed on bag.
  5. Remove chicken from marinade and discard marinade. Grill or broil chicken while rice is cooking.
  6. Stir can of crushed pineapple (drained) and about 3/4 cup of cashew pieces into cooked rice.
  7. Reheat other half of marinade. Serve grilled chicken over rice mixture with sauce. Also serve any type oriental vegetables you desire (I recommend snow peas, water chestnuts, cauliflower, broccoli and carrots.)


Enjoy!

Next Up: 

Blasted Rapid Roast Whole Chicken

Be sure to Follow Foodgasm Recipes on Pinterest for more great recipes!

Recipe based on one by Marg
Photo by Diana Johnson

Baked Spaghetti Pie – Super Easy

This Super Baked Spaghetti Pie has made it onto my best list. It’s wonderful! How can a home-made fast-food style meal taste so good!


The spaghetti made a great pie crust and the taste was sublime. A real home-cooked and hearty meal. A keeper for me!

This is a great recipe to make ahead of time and have ready for a late supper after the game or a midnight supper when teens demand food.

Be sure to Follow Foodgasm Recipes on Pinterest for more great recipes!

Super Baked Spaghetti Pie
Prep Time
30 mins
Cook Time
50 mins
Total Time
1 hr 20 mins
 

This Baked Spaghetti Pie really is super.

Course: Main Course
Cuisine: Italian
Keyword: Baked Spaghetti Pie
Servings: 6
Calories: 295 kcal
Ingredients
  • 6 ounces uncooked spaghetti
  • 1/3 cup grated Parmesan cheese
  • 1 egg beaten
  • 1 tablespoon butter melted
  • 1 cup small curd cottage cheese drained
  • 1/2 pound lean ground beef
  • 1/2 pound Italian sausage
  • 1/2 cup chopped onion
  • 1 15 ounce can tomato sauce
  • 1 teaspoon garlic powder
  • 1 tablespoon sugar
  • 1/2 teaspoon salt
  • 1/2 teaspoon seasoned pepper
  • 1 teaspoon oregano
  • 1/2 cup shredded mozzarella cheese
Instructions
  1. Cook spaghetti according to package directions.
  2. While spaghetti is still warm, stir in Parmesan cheese, egg, and margarine in a large bowl.
  3. Pour into well greased 10 inch pie plate and pat mixture up and around sides with a spoon to form a crust.
  4. Spoon cottage cheese over spaghetti crust.
  5. In a skillet, brown ground meat, sausage, and onion, then drain off fat and add tomato sauce and seasonings.
  6. Simmer 10 minutes, stirring occasionally.
  7. Spoon meat mixture over the cottage cheese.
  8. Bake at 350 degrees for 30 minutes.
  9. Arrange mozzarella on top and return to oven just until cheese melts.


Enjoy!

Up Next: 

Hamburger Ramen Skillet Supper

Be sure to Follow Foodgasm Recipes on Pinterest for more great recipes!

Recipe based on one by weekend cooker
Photo by French Tart

Italian Sausage Pasta Bake – Make-Ahead Casserole

Not only is this Italian Sausage Pasta Bake beautiful, it is delicious! When I was putting it together I knew it was going to be special!


This wonderful hearty, make-ahead casserole really hits the spot. Full of flavor and easy to make (and freeze) for those hectic or lazy days ahead.

An awesomely tasty dish just right for a snowy evening! Great weeknight meal and makes enough to have as leftovers later in the week.

Be sure to Follow Foodgasm Recipes on Pinterest for more great recipes!

Italian Sausage Pasta Bake
Prep Time
25 mins
Cook Time
1 hr
Total Time
1 hr 25 mins
 

I love Italian dishes and this Italian Sausage Pasta Bake is one of my favorites.

Course: Main Course
Cuisine: Italian
Keyword: Italian Sausage Pasta Bake
Servings: 6
Calories: 425 kcal
Ingredients
  • 1 1/2 pounds Italian sausage mild or hot
  • olive oil optional
  • 2 onions coarsely chopped
  • 3 garlic cloves minced
  • 1 large sweet red pepper coarsely chopped
  • 28 ounces meatless extra chunky pasta sauce
  • 213 ml can tomato sauce
  • 1 teaspoon dried basil
  • 1 teaspoon oregano
  • 1 teaspoon fennel seed
  • 5 cups penne pasta
  • 1 284 g package fresh spinach (trimmed and coarsely chopped)
  • 3 cups shredded provolone cheese or 3 cups mozzarella cheese
  • 1 cup grated asiago cheese or 1 cup parmesan cheese
Instructions
  1. Cut sausage into 1/2 inch chunks. In a large skillet, brown the sausage over medium-high heat, in batches and adding oil if necessary. Transfer sausage to a bowl.
  2. Pour off any fat from pan. Add onions, garlic and red pepper, cook over medium heat, stirring occasionally, for about 5 minutes or until softened.
  3. Stir in pasta sauce, tomato sauce, basil, oregano and fennel seeds; bring to a boil, stirring and scraping up any brown bits from bottom of pan. Return sausage and any accumulated juices to pan; cover and simmer for 15 minutes or until sausage is firm throughout.
  4. Meanwhile, in a large pot of boiling salted water, cook pasta for 6 minutes, add spinach; cook for 1 minute. Drain well and return to pot. Add sausage mixture and provolone/mozzarella cheese; stir to combine well.
  5. Transfer to 2 greased 8-inch square baking dishes or 1 13x9-inch dish. Sprinkle with Asiago/parmesan cheese. Cover dish with greased foil, greased side down.
  6. To serve: Bake, covered with foil, in in 375 degree F. oven for 30 minutes or for 1 hour if from the refrigerator. This freezes beautifully (thaw in refrigerator before baking).

Enjoy this Italian Sausage Pasta Bake!

Up Next:

Baked Spanish Chicken Rice

Be sure to Follow Foodgasm Recipes on Pinterest for more great recipes!

Recipe based on one by Chili Spice
Photo by French Tart

Dogs And Taters – Cheap, Easy, Fun, & Delicious!

Oh my, Dogs And Taters is such good comfort food!! So darn simple, and very tasty indeed! An easy family dish that’s really popular with Dads and kiddos.


Make it quicker by using frozen potatoes O’Brien or even frozen hash browns. I have also made this with polish sausage and even brats.

Use a dog that has a good strong flavor.

Always great and super simple!

Be sure to Follow Foodgasm Recipes on Pinterest for more great recipes!

Dogs And Taters
Prep Time
10 mins
Cook Time
20 mins
Total Time
30 mins
 

A cheap, easy dish to make that the kiddos will ask for again and again!

Course: Main Course
Cuisine: American
Keyword: Dogs and Taters
Servings: 6
Calories: 365 kcal
Ingredients
  • 8 beef hot dogs sliced
  • 4 tablespoons oil
  • 1/2 cup chopped onion
  • 1 teaspoon garlic salt
  • 1/2 teaspoon pepper
  • 4 large potatoes peeled and diced
  • 2 ounces shredded cheddar cheese
Instructions
  1. Microwave the potatoes until beginning to soften.

  2. Add the potatoes, garlic salt, pepper, and onions to a large skillet with a little oil over medium heat. When the potatoes first start to brown add the hot dogs.

  3. Continue cooking, turning occasionally until the potatoes are tender and browned.

  4. Sprinkle with cheese.
  5. Cover and let the cheese melt into the potatoes.


Enjoy!

Up Next:

Scalloped Potatoes Ham Casserole

Be sure to Follow Foodgasm Recipes on Pinterest for more great recipes!

Recipe based on one by MizzNezz
Photo by Chef shapeweaver

Blasted Rapid Roast Whole Chicken

This Blasted Rapid Roast Whole Chicken is fantastic! I made it for dinner at my house and it was SO GOOD. I love the bit of kick from the cayenne pepper.

Roast Whole Chicken

Blasting with high heat will shrink the skin and seal in all the juices to create an extremely moist and tender chicken with lovely crispy skin – and it will be on your table in about an hour.

This method will also work with a larger chicken, or even a turkey, but cooking time will need to be increased. You may adjust all seasonings to taste.

Be sure to Like Foodgasm Recipes on Facebook for more great recipes.

Blasted Rapid Roast Whole Chicken
Ingredients
  • 1 whole chicken about 3 to 3-1/2 pounds
  • 2 tablespoons oil
  • 2 tablespoons melted margarine or 2 tablespoons butter
  • 1 1/2 tablespoons lemon juice
  • 1 1/2 tablespoons seasoning salt
  • 1 teaspoon garlic powder
  • 1/2 teaspoon fresh ground black pepper
  • 1/8 teaspoon cayenne pepper optional
  • 1 whole lemon poked all over with holes using a fork
Instructions
  1. Rinse the chicken inside and out well under cold water, then pat dry using a paper towel.
  2. In a small bowl mix the lemon juice with oil and melted butter until blended, then rub all over the chicken.
  3. Using clean hands rub the inside and outside of the chicken with seasoned salt, garlic powder, black pepper and cayenne (you can season the chicken under the skin also if desired).
  4. Place the lemon/s inside the cavity.
  5. Place the chicken into a baking dish (You may want to add in a little water to the pan to prevent smoking). Using cotton string tie the legs together tightly.
  6. At this point you may cover and refrigerate for up to 6 hours (not more than that or the acid in the lemon juice will start to "cook" the chicken).
  7. Set oven to 450 degrees F.
  8. Roast the chicken at 450 degrees for 20 minutes, then reduce the heat to 400 degrees and continue roasting for about 40 minutes (or until the internal temperature reaches about 175 to 180 degrees F. about 1 hour or a little less).
  9. Cover with foil and let sit for 15 minutes before slicing (do not slice before that time or the juices will flow out!).

Enjoy!

Be sure to Like Foodgasm Recipes on Facebook for more great recipes.

Up Next:

Simple Caribbean Jerk Chicken

Recipe based on one by Kittencal
Photo by Gamer Gal

Swedish Meatballs – Great Main Dish or Appetizer

Swedish Meatballs are really easy to prepare, and I like that I didn’t have to fry the meatballs. Simple and tasty, nice weeknight meal.


They can also be served as an appetizer.

You can make the meatballs the night before, so dinner prep is a snap. I almost always double the recipe so I have enough left over for a second meal down the road!

Great served over noodles, rice, or even potatoes.

Be sure to Follow Foodgasm Recipes on Pinterest for more great recipes!

Swedish Meatballs
Prep Time
20 mins
Cook Time
1 hr 10 mins
Resting
10 mins
Total Time
1 hr 40 mins
 

Swedish Meatballs have been around for a long time. This recipe is classic!

Course: Main Course
Cuisine: Swedish
Keyword: Swedish Meatballs
Servings: 6
Calories: 395 kcal
Ingredients
For The Meatballs
  • 1 lb ground beef
  • 2/3 cup milk
  • 1/2 cup breadcrumbs
  • 1 egg
  • 1 teaspoon onion powder
  • 1 teaspoon salt
  • 1/4 teaspoon nutmeg
  • pepper
For The Sauce
  • 1 10 3/4 ounce can condensed cream of mushroom soup
  • 1/2 cup sour cream
  • 1/2 cup milk
  • Kitchen Bouquet for color
Instructions
To Make The Meatballs:
  1. Preheat oven to 400ºF.
  2. Mix all ingredients for the meatballs together. Shape into balls. Place on cookie sheet. Bake for 10 minutes or until browned.

  3. Remove meatballs from oven and place in a casserole dish.

  4. Turn oven temperature to 350ºF.
To Make The Sauce:
  1. Stir together ingredients for the sauce and combine with the meatballs in the casserole.

  2. Bake, covered, for 1 hour.
  3. Let stand covered for 10 minutes before serving.


Enjoy!

Up Next:

Baba’s Homemade Perogies Recipe

Be sure to Follow Foodgasm Recipes on Pinterest for more great recipes!

Recipe based on one by Nana Lee
Photo by Wildflour

Alton Brown’s Buttermilk Fried Chicken

The crust on Alton Brown’s Buttermilk Fried Chicken will really amaze you. Not only is it nice and crusty but Alton adds great seasonings also! It’s adapted from his Good Eats show.


Great tasting fried chicken! Alton’s technique of applying the seasonings keeps them from getting lost in the flour, but trapped just underneath the crust!

This will surely go into ‘my favorites’ cookbook!

Be sure to Follow Foodgasm Recipes on Pinterest for more great recipes!

Alton Brown's Buttermilk Fried Chicken
Prep Time
25 mins
Cook Time
30 mins
Marinating Time
12 hrs
Total Time
12 hrs 55 mins
 

Alton Brown's Buttermilk Fried Chicken is absolutely the best fried chicken I've ever eaten!

Course: Main Course
Cuisine: American
Keyword: Alton Brown's Buttermilk Fried Chicken
Servings: 4
Calories: 365 kcal
Ingredients
  • 1 broiler-fryer chicken cut into 8 pieces
  • 2 cups low-fat buttermilk
  • 2 tablespoons kosher salt
  • 2 tablespoons Hungarian paprika
  • 2 teaspoons garlic powder
  • 1 teaspoon cayenne pepper
  • 1 cup flour for dredging
  • vegetable shortening for frying
Instructions
  1. Place the chicken pieces into a plastic container and cover with buttermilk. Cover and refrigerate for 12-24 hours .
  2. Drain the chicken in a colander.
  3. Combine the salt, paprika, garlic powder, and cayenne pepper. Liberally season chicken with this mixture.
  4. Then, dredge the chicken in the flour and shake off the excess (by seasoning before you flour, you trap the seasoning under the flour coating, and you use a lot less seasoning than if you tried to put it in the flour and hope it catches on the chicken).
  5. Melt enough shortening (over low heat) to come just 1/8-inch up the side of a 12-inch cast iron skillet or heavy fry pan.
  6. Once the shortening liquefies raise heat to 325 degrees F. Do not allow oil to go over 325 degrees F.
  7. Place the chicken skin side down into the pan. Put the thighs in the center (they take longer to cook and can use the extra center heat), and breast and legs around the edge of the pan. The oil should come half way up the pan once the chicken is added.
  8. Cook the chicken until golden brown on each side, approximately 10-12 minutes per side. The internal temperature should be right around 180 degrees. (Be careful to monitor shortening temperature every few minutes).
Recipe Notes

Drain the chicken on a rack over a sheet pan, NOT on paper towels or brown paper bags which just cause the chicken to soak in their own oil.


If you need to hold the chicken before serving, cover loosely with foil but avoid holding in a warm oven, especially if it's a gas oven, which is very moist and will ruin your beautiful chicken crust!


Enjoy!

Tips And Tidbits About Alton Brown’s Buttermilk Fried Chicken.

These are tips for most any fried chicken recipe. Not just Alton Browns Buttermilk Fried Chicken!

Set up a “dredging station” to minimize mess and make cleanup easy. Put your ingredients and mixtures into large shallow bowls or baking dishes. Then work in one direction (left to right, for example), moving from seasoned flour to egg batter over to bread crumbs/panko/coating mixture.

Have one “wet hand” and one “dry hand” — and use your “wet” hand to transfer chicken from the wet mixture to the coating bowl.

Gently shake off the excess flour and place the coated chicken on the parchment- or wax paper-lined baking sheet.

Before easing the coated chicken pieces into hot fat, allow them to rest, which will give the coating a chance to adhere. (Do this step in the refrigerator if you won’t be frying the chicken within half an hour.)

Up Next:

Thai-Grilled Chicken Thighs


Be sure to Follow Foodgasm Recipes on Pinterest for more great recipes!

Recipe based on one by Gay Gilmore
Photo by KK – Chef #426156

Glazed Ham with Chipotle Peppers

This Glazed Ham with Chipotle Peppers recipe is the most wonderful recipe EVER!!  Sweet, Smokey, Spicy, and delicious.


I love it. Kids love it. Families love it. This glaze would taste great on an old shoe… lol.

Seriously I think this glaze would be great on chicken, pork.. but I think I’m going to try it on some baby back ribs.. just the right spice and “stickiness”

This was the prettiest, tastiest ham I have ever made!! Looking forward to using the yummy leftovers in a ham and potato casserole recipe!

I’ll be making this often!

Be sure to Follow Foodgasm Recipes on Pinterest for more great recipes!

Glazed Ham with Chipotle Peppers
Prep Time
20 mins
Cook Time
1 hr 15 mins
Total Time
1 hr 35 mins
 

There's nothing I enjoy more for holidays than ham and this Glazed Ham With Chipotle Peppers is a favorite!

Course: Main Course
Cuisine: American
Keyword: Glazed Ham With Chipotle Peppers
Servings: 12
Ingredients
  • 5 -7 lbs smoked ham
  • 1 cup packed brown sugar
  • 1 10 ounce can crushed pineapple
  • 1 -2 chipotle chile in adobo seeded and diced
  • 1 tablespoon adobo sauce
  • 1/4 teaspoon fresh grated nutmeg
  • 1/4 teaspoon fresh ginger
  • 2 tablespoons cornstarch
  • 1/4 teaspoon salt
Instructions
  1. Mix cornstarch with a little cold water to dissolve.
  2. Place all ingredients except for ham in a blender and blend smooth, in a small saucepan over medium heat bring to a boil then simmer till thickened.
  3. Preheat oven to 375 ° F.
  4. Place ham, cut end down, in a large baking pan and score skin. Bake ham for 15 minutes.
  5. Brush glaze over ham and bake for another hour or until internal temperature reads 140 °F.
  6. Baste halfway through baking.


Enjoy!

Up Next: 

Split Pea Soup With Ham And Potatoes

Be sure to Follow Foodgasm Recipes on Pinterest for more great recipes!

Recipe based on one by Rita~
Photo by Delicious as it Looks

Parmesan Crusted Chicken Schnitzels

These Parmesan Crusted Chicken Schnitzels are a delectable low-calorie chicken dish packed with flavor but not calories. The flavor is sooo good.


I used panko breadcrumbs and shredded Parmesan and I serve it with lots of steamed greens and a grilled tomato.

It makes for a delicious dinner.

If you are NOT worried about the extra calories, brush the chicken fillets with a little oil before baking, or pan-fry them in a little oil or butter.

Be sure to Follow Foodgasm Recipes on Pinterest for more great recipes!

Parmesan Crusted Chicken Schnitzels
Prep Time
20 mins
Cook Time
25 mins
Total Time
45 mins
 

Parmesan Crusted Chicken Schnitzels sounds really fancy but they are easy to make!

Course: Main Course
Cuisine: American
Keyword: Parmesan Crusted Chicken Schnitzels
Servings: 4
Calories: 395 kcal
Ingredients
  • 2 boneless skinless chicken breasts about 250g/8ozs
  • 2 tablespoons breadcrumbs
  • 2 tablespoons grated Parmesan cheese
  • 1 teaspoon garlic granules or 1 teaspoon garlic powder
  • 1 teaspoon dried oregano
  • salt and pepper
  • vegetable oil optional for those not on a calorie controlled diet
Instructions
  1. Beat the chicken breasts with a mallet until they are flat. This is best done between cling-film.
  2. Mix the rest of the ingredients together and then put them into a large bowl.
  3. Dip the chicken schnitzels in the seasoned crumbs and then place the onto a non-stock baking tray.
  4. Bake at 400F for between 20 and 25 minutes or until the chicken is cooked and the crumb coating is crisp and golden.
  5. Serve immediately with a lemon wedge, some grilled tomatoes and seasonal greens.


Enjoy!

Up Next:

Glazed Ham with Chipotle Peppers

Be sure to Follow Foodgasm Recipes on Pinterest for more great recipes!

Recipe based on one by French Tart
Photo by French Tart