Oven Baked Smothered Pork Chops

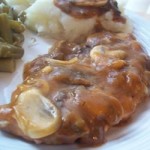
Oven Baked Smothered Pork Chops are so yummy, I never make enough.

Seasoned pork chops are smothered in a golden mushroom sauce and baked with fresh mushroom slices and onion.

This is a real comfort food recipe, combining pork with a spiced onion gravy.

This recipe is easy to make and you can serve it with rice, cornbread, and a side dish that you enjoy.

Be sure to Like Foodgasm Recipes on Facebook and Foodgasm on Pinterest for more great recipes.

Oven Baked Smothered Pork Chops
Prep Time
30 mins
Cook Time
1 hr
Total Time
1 hr 30 mins
 

Delicious pork chops made easy by oven baking! 

Course: Main Course
Cuisine: American
Servings: 6
Calories: 320 kcal
Ingredients
  • 6 pork chops
  • 1/4 teaspoon seasoned salt
  • 1/4 teaspoon freshly ground black pepper
  • 1 onion chopped
  • 1/2 cup fresh sliced mushrooms
  • 2 0.75 ounce cans 1condensed golden mushroom soup
Instructions
  1. Preheat oven to 375 degrees F (190 degrees C).
  2. Rinse pork chops, pat dry, and season with seasoned salt and pepper. Place them in a 9x13 inch baking dish. In a separate small bowl, combine the onion, mushrooms and soup. Mix together well and spoon over the chops.
  3. Cover, and bake at 375 degrees F (190 degrees C) for 45 minutes. Uncover, and bake for 15 more minutes. (Note: Time could be less or more depending on the thickness of the chops.) Pork chops are done when their internal temperature has reached 145 degrees F (63 degrees C).

Tips and Tidbits About Oven Baked Smothered Pork Chops

Be sure to cook your pork chops correctly! Under or overcooked pork is definitely not a good thing!

All meat carries the possibility of food-borne illnesses if under cooked and pork is no different. Not good, not good!

The opposite is overcooked and even though it’s not potentially bad for health who likes a tough, dried out, chewy pork chop. Don’t overcook!

The ideal is cooking pork to an internal temperature of about 145 degrees when it becomes safe to eat. Cooking much past that temperature and you could wind up with shoe leather!

The best way to check for pork chop doneness is with a meat thermometer placed in the thickest part of the chop.

Different types of chops may require different cooking times.

Up Next:

Pan Grilled Pork Chops

Be sure to Like Foodgasm Recipes on Facebook and Foodgasm on Pinterest for more great recipes.

Dutch Apple Pie

Dutch Apple Pie is an irresistible fruit pie that dates back to the late medieval times. Today, in America, “Dutch Apple Pie” has evolved into an apple pie with a crunchy buttery streusel topping. Excellent for serving after holiday meals or even a family meal.

Dutch Apple Pie

Your family is special. They deserve treats!

I invite you to give this a go to impress your family and friends with a historical dessert….you just may impress yourself.

Be sure to follow Foodgasm Recipes on Pinterest for more great recipes.

Dutch Apple Pie
Prep Time
35 mins
Cook Time
50 mins
Resting Time
3 hrs
Total Time
1 hr 25 mins
 

A delicious apple pie from past history. 

Course: Dessert
Cuisine: American
Servings: 6
Calories: 295 kcal
Ingredients
  • 1- 9 inch unbaked pie shell
For pie filling...
  • 4-5 cups green Granny Smith Apples rinsed, peeled, cored and sliced
  • 1/2 cup sugar
  • 1/2 teaspoon cinnamon
  • 1/4 teaspoon salt optional
Instructions
  1. Preheat oven to 450 degrees F.
  2. In small mixing bowl whisk together sugar, cinnamon and salt. Set aside.
  3. In large mixing bowl add sliced apples.
  4. Pour sugar and cinnamon over apple. Toss well. Set aside.
Pie Topping...
  1. 3/4 cup self-rising flour
  2. 1/2 cup sugar
  3. 1/3 cup chilled butter, cubed
  4. In medium size mixing bowl add flour and sugar, Whisk well together. Add cubed butter. Cut butter into flour and sugar with two knifes or a pasty tool until texture looks crumbly.
  5. Add sugar and cinnamon coated apples to the unbaked pie shell. Arrange apple slices evenly into pie shell.
  6. Cover apples evenly with crumbly butter mixture topping.
  7. Add pie onto a baking sheet. Bake pie in 450 degree F oven for 10 minutes. Use timer. After 10 minute reduce oven temperature to 350 degrees F., bake an additional 40 minutes.
  8. Remove pie from oven and cool for 2-3 hours before serving.

Enjoy!

If you want to make this pie and store it for later use, place it into a 1-gallon freezer bag and freeze before baking. Remove from freezer, allow to thaw and bake as directed.

Be sure to follow Foodgasm Recipes on Pinterest for more great recipes.

Coca Cola Cake

Old-Fashioned Coca Cola Cake… created in the southern part of the USA during the 1950’s!! It’s a regular staple for social gatherings and celebrations in the south.

Coca Cola Cake

The addition of the cola adds an additional sweetness and the carbonation adds an airiness to the texture of the cake.

This cake is easy to make and after enjoying your first piece, you will definitely see why Southerners love this chocolate, gooey goodness!

Be sure to follow Foodgasm Recipes on Pinterest for more great recipes.

Southern Coca Cola Cake
Prep Time
45 mins
Cook Time
35 mins
Total Time
1 hr 20 mins
 

A delicious Southern sweet treat. 

Course: Dessert
Cuisine: American
Servings: 6
Calories: 360 kcal
Ingredients
  • Preheat oven to 350 degrees F.
  • Butter a 13" by 9" pan. Set aside.
Cake
  • 2 cups all-purpose flour
  • 2 cups sugar
  • 1 teaspoon baking soda
  • 1/2 teaspoon salt
  • 1/2 teaspoon cinnamon ground
  • 1 12 oz. can Coca-Cola
  • 1 cup butter cubed
  • 1/4 cup unsweetened cocoa powder
  • 2 eggs
  • 1/2 cup buttermilk
  • 1 teaspoon vanilla extract
Frosting/Glaze
  • 4 cups powdered sugar
  • 1/4 cup unsweetened Cocoa
  • 1/2 cup butter cubed
  • 1 12 oz. can Coca-Cola
  • 1/2 cup pecans optional
Instructions
  1. In a large bowl, whisk together flour, sugar, baking soda, salt and cinnamon. Set aside. In a small saucepan add cola, butter and cocoa, over medium-heat, bring just to a boil, stirring occasionally. Add to flour mixture, stirring until just moist.
  2. In a small mixing bowl, whisk together eggs, buttermilk and vanilla. Add buttermilk mixture to flour mixture, whisking until well blended.
  3. Pour into prepared buttered pan. Bake 25-30 minutes or until toothpick inserted in center comes out clean.
  4. About 15 minutes before cake has completed baking, prepare frosting/glaze. In a small saucepan, over medium-heat, bring can of Cola to a boil. Reduce cola liquid to 1/2 cup; this will take about 15 to 20 minutes. Whisk in butter and unsweetened cocoa. Remove from heat.
  5. Whisk in powdered sugar until smooth. Stir in pecans (optional) at this time. Pour over warm cake. Cool about 1 hour before serving.

Enjoy!

Tips and Tidbits About Coca Cola Cake

Some Coca Cola Cake recipes call for marshmallows. The marshmallows float to the top melting over the chocolate cake giving it a chewy brownie like crust.

If you would like to try that add 1 1/2 cups of miniature marshmallows to the buttermilk mixture in step two.

Personally I prefer the marshmallow effect. It’s addictive. Chewy delicious crust!! I call it “crack cocaine cake”. LOL

Be sure to follow Foodgasm Recipes on Pinterest for more great recipes.

Ranch Mashed Potatoes – No Gravy Needed

I recently discovered this great Ranch Mashed Potatoes recipe. No gravy needed! With the cheese, Ranch dressing, sour cream, and butter they’re delicious without gravy.

Plain mashed potatoes can get pretty bland if you serve them two or three times a week.

When I was growing up there was never just mashed potatoes. There were “taters and gravy”. We always had gravy.

These Ranch Mashed potatoes don’t need gravy! They make a great addition to any type of meat main dish and works well for leftovers.

Be sure follow Foodgasm Recipes on Pinterest for more great recipes.

Ranch Mashed Potatoes
Prep Time
30 mins
Cook Time
25 mins
Total Time
55 mins
 

Easy to make and needs no gravy! Perfect for something different in the mashed potato category. 

Course: Side Dish
Cuisine: American
Servings: 6
Calories: 280 kcal
Ingredients
  • 8 baking potatoes peeled and quartered
  • 1 8 ounce package cream cheese, softened
  • 1 1 ounce package dry Ranch-style dressing mix
  • 1 cup sour cream
  • 1/2 cup butter softened
Instructions
  1. Bring a large pot of salted water to a boil. Add potatoes and cook until tender, about 25 minutes. Drain and mash.
  2. In a large bowl beat the cream cheese and dressing mix until smooth. Stir in mashed potatoes, sour cream and butter; beat until desired consistency is reached.

Be sure to follow Foodgasm Recipes on Pinterest for more great recipes.

Tips and Tidbits About Ranch Mashed Potatoes

Selecting The Right Potato

You should avoid waxy varieties like Red Bliss or any of the fingerling types. What you want for the best-mashed potatoes are varieties that have a high starch content. These will break down and absorb dairy better than the low starch varieties.

For fluffier mashed potatoes, use starchy potatoes, like Russets or Yukon Golds. Or better yet, use a combination of both.

Don’t Over Mash Potatoes

When potatoes are mashed they release their starch. The more you work the potatoes, the more starch gets released. When too much starch gets released, the potatoes become gummy, gluey, and unappetizing.

Overworking the potatoes can happen in a couple of ways: either by simply handling them too much, or by using a food processor, blender, or similar tool, which mixes the potatoes too aggressively.

Limit the amount you handle the potatoes. It’s best to use a ricer or food mill for fluffy, lump-free mashed potatoes.

Up Next: 

Slow Cooker Baked Potatoes

Be sure to follow Foodgasm Recipes on Pinterest for more great recipes.

Homemade Fudgy Brownies

These are Homemade Fudgy Brownies. The ooey gooey delicious brownies that I love. I will NEVER buy brownie mix again. There are thousands of recipes for brownies, both “cake-style” and “fudge-style” and everything in-between.

Homemade Fudgy Brownies

What determines the style of brownie is its ratio of flour to chocolate and/or cocoa. These have the perfect ratio!

Be sure follow Foodgasm on Pinterest for more great recipes.

Homemade Fudgy Brownies
Prep Time
30 mins
Cook Time
45 mins
Total Time
1 hr 15 mins
 

Oooey gooey and delicious. Just the right ration of ingredients! 

Course: Dessert
Cuisine: American
Ingredients
  • 5 ounces Unsalted Butter at room temperature
  • 7 ounces Bittersweet Chocolate melted
  • 1 Cup Sugar
  • 2 tsp Vanilla Extract
  • ¼ tsp Salt
  • 1 Tbsp Cocoa Powder
  • 2 Large Eggs
  • 2 Tbsp warm Water
  • 1 tsp Instant Espresso Powder
  • 2/3 Cup All Purpose Flour
Instructions
  1. Preheat oven to 350. Spray an 8 by 8 inch square pan with non stick cooking spray and lay the bottom with parchment paper. Set aside.
  2. In a small cup mix together the warm water with the instant espresso powder, set aside.
  3. In a large bowl whisk together the sugar and butter until fluffy. Add the eggs, vanilla extract and espresso mixture. Beat until all is combined.
  4. Add the melted chocolate and whisk, add the dry ingredients and mix everything together until it’s incorporated but don’t over mix.
  5. Pour batter into your prepared pan and bake for about 40 to 45 minutes or until when a toothpick inserted in the middle comes out with moist crumbs but not wet batter.
  6. Cool for about 5 minutes in the pan and then transfer them to a cooling rack to cool completely.
  7. Cut into bars and serve!

Tips and Tidbits About Homemade Fudgy Brownies

Do not use a mixer because you can over mix your batter and whip too much air into the eggs. This makes your brownies have a cakey texture.

Mix everything by hand in a bowl and lightly beat your eggs before adding them to the mixture. Gently stirring everything together makes them turn out better as opposed to frantically beating the mixture.

Be sure follow Foodgasm on Pinterest for more great recipes.

Perfect Hard Boiled Eggs


Perfect Hard Boiled Eggs

Have you ever boiled eggs and discovered that they weren’t “pretty” once you peeled them? What about nicking off half the egg because you couldn’t get the shell off?

These are the two most frustrating things about cooking hard-boiled eggs. The yolk isn’t pretty and the shell is difficult to get off.

Now, before you decide to head over to the grocery to purchase those overpriced and convenient hard boiled eggs; check out how easy it is to get them perfect at home-every time.

When you do it right, not only do you have an exquisitely yellow center but you also have a hard boiled egg that is easy to peel.

There are 3 things to keep in mind:

Eggs must not be fresh (10+ days)
Don’t let them boil forever, and
After cooking, cool the eggs quickly to “shock” them.

If you remember to do this, you’ll have perfect, beautiful eggs every single time.

To help you long we have a how-to video plus complete written instructions and then we have a Tips and Tidbits section. Enjoy!

Click the NEXT arrow to watch the video.

next arrow resized

Kentucky Derby Pie – Not Granny’s Pecan Pie

Do you have a memory of your grandmothers’ pecan pie? A pie that you dearly loved. Well, this Kentucky Derby Pie is not your grandmothers’ pecan pie.

No, no. It’s a kicked-up pecan pie. A pecan pie on steroids!

Kentucky Derby pie is, under the hood, basically a pecan pie. The addition of chocolate and bourbon is what makes it a Kentucky Derby pie.

You wouldn’t think that just the addition of two ingredients would make such a difference. But just wait until you try it. You’ll see that it does.

After the first taste, you’ll agree that this pie is just an absolute killer. Plus it’s easy as, well… pie.

Be sure to Follow Foodgasm Recipes on Pinterest for more great recipes!

Kentucky Derby Pie Recipe
Ingredients
  • 1 9" unbaked pie shell
  • 1/4 cup butter unsalted
  • 2 ounces unsweetened chocolate
  • 3 large eggs lightly beaten
  • 1/2 cup sugar
  • 1/2 cup brown sugar
  • 3/4 cup dark brown corn syrup
  • 1/2 teaspoon pure vanilla extract
  • 1/4 teaspoon salt
  • 3 Tablespoons bourbon
  • 1 1/2 cups pecans chopped
Instructions
  1. Preheat oven to 350 F.
  2. In small sauce pan. over low heat...melt butter and chocolate together.
  3. In a large bowl...add eggs, sugars, corn syrup, vanilla, salt and bourbon. Whisk well. Add melted butter and chocolate. Whisk well.
  4. Add unbaked pie crust to cookie sheet (makes transporting pie from counter top to oven much easier). Add pecan to bottom of pie shell. Slowly pour pie filling over pecans.
  5. Bake for 40-45 minutes.
  6. Cool on rack 1-2 hours before serving.

Tips and Tidbits About Kentucky Derby Pie

The pie can be made 1 day before serving by storing (completely cooled pie) in an airtight container.

Once you prepare the filling don’t let it sit. The longer the filling stands, the more “separated” the filling may appear after baking.

Shield edges of pie with foil to prevent over-browning. Fold a 12-inch square of foil into quarters to cut a 7-inch circle from the center; discard the center portion. Unfold the square and place over the top of the pie.

You can cover the entire pie with foil. Uncover the last 25 minutes for browning.

Preheat baking sheet, on the lowest rack, in the oven as it preheats. Bake pie on the preheated baking sheet on the lowest oven rack to crisp the bottom crust.

Place the aluminum pie pan inside a Pyrex pie plate before baking. The thick glass bakes the pie more evenly, resulting in a better crust, and the stronger material also makes it easier to transfer piping-hot pies in and out of the oven.

The first slice of pie is always the hardest to get out of the pan. Always. It crumbles and smooshes and collapses on the plate. Very disappointing, especially when standing at the head of the table serving a carefully constructed pie to eager guests. I finally had a “Duh!” moment and realized the obvious solution: the sacrificial slice.

You might argue that the first piece of pie is always the sacrificial slice — I usually set this sad and broken (though still tasty!) piece of pie off to the side to serve myself once the more beauteous slices have been passed out.

But a far more economical solution is to cut just the tiniest sliver of the pie as your “first slice” and then cut the rest of the pie into normal-sized wedges. This solves the problem of getting under the slice and letting you lift it cleanly from the pan, but it doesn’t waste an entire serving in the process.

This approach works not only for pies, but for brownies, casseroles, and anything else that’s hard to get out of the pan on the first go-round.

Oh, and also? The sacrificial slice that gets set aside in favor of grander, more show-worthy pieces? If you want to hide it somewhere and rename it “midnight snack,” I won’t tell a soul.

Enjoy!

Up Next:

Banana Cream Pie – Granny’s Best Recipe

Be sure to Follow Foodgasm Recipes on Pinterest for more great recipes!

Cake Pops


Cake Pops

Cake Pops are the perfect treat for any type of occasion, from children’s parties to fancy weddings. We love them for their versatility: They can be cute, elegant or trendy.

But, we love them even more because they’re also incredibly sturdy, thanks to the coating that wraps around the delicious mixture of cake in the center.

They are an unusual treat and they’re very easy to make!

Click the NEXT arrow to watch the video.

next arrow resized

Homemade KFC Style Popcorn Chicken

If you have been stressing over what you can serve the kids at snack time, then your worries are over because not only is this Homemade KFC Style Popcorn Chicken or chicken poppers fun and easy to make, they will also give the kids a delicious chicken treat.

Homemade KFC Style Popcorn Chicken

Not only will the kids enjoy eating the KFC popcorn chicken, but you and your friends will also.

This recipe is a “copycat” of KFC’s popcorn chicken.

Be sure to Follow Foodgasm Recipes on Pinterest for more great recipes!

Homemade KFC Style Popcorn Chicken

Ingredients

2 Chicken Breast Fillets
1/2 Tsp Salt
1/2 Tsp Black Pepper
1 Tbsp Soy Sauce
1 Medium-sized egg
1 Tbsp Corn Starch

For coating

1 Cup All-Purpose Flour
1 Tbsp Red Chili Powder or Paprika

Note: You can also add any spices of your liking: e.g Garlic, Onion Powder

Oil for frying

Serve with your favorite dipping sauce.

This recipe is designed to copycat KFC popcorn chicken. But you don’t have to go that route. The basic technique and your own spices would do just fine. It’s fun to experiment and chicken is cheap.

A variation that pops up in my mind is Buffalo Wings Popcorn chicken. Add hot sauce to the recipe and serve with blue cheese dipping sauce and celery sticks.

The recipe calls for chicken breasts cut to size. If you don’t mind splurging a bit chicken tenders make a much better product. Chicken tenders are the “filet mignon” of the chicken.

The variations are really unlimited. Play with it. Have fun. Enjoy!

Be sure to Follow Foodgasm Recipes on Pinterest for more great recipes!

Bacon Ranch Pasta Salad – Deliciously Easy

If you are not yet a fan of pasta salad I hope to convince you with this Bacon Ranch Pasta Salad. It’s the ranch dressing mix and bacon that makes it unique.


This recipe calls for rotini pasta but any will work.

This is delicious and has a very pretty presentation. Perfect for potlucks, BBQ’s or any other occasion. Love it!

Be sure to follow us on Foodgasm on Pinterest for more great recipes.

Bacon Ranch Pasta Salad
Ingredients
  • 1 12 ounce package uncooked tri-color rotini pasta
  • 10 slices bacon
  • 1 cup mayonnaise
  • 3 tablespoons dry ranch salad dressing mix
  • 1/4 teaspoon garlic powder
  • 1/2 teaspoon garlic pepper
  • 1/2 cup milk or as needed
  • 1 large tomato chopped
  • 1 4.25 ounce can sliced black olives
  • 1 cup shredded sharp Cheddar cheese
Instructions
  1. Bring a large pot of lightly salted water to a boil; cook rotini at a boil until tender yet firm to the bite, about 8 minutes; drain.
  2. Place bacon in a skillet over medium-high heat and cook until evenly brown. Drain and chop.
  3. In a large bowl, mix mayonnaise, ranch dressing mix, garlic powder, and garlic pepper. Stir in milk until smooth. Place rotini, bacon, tomato, black olives and cheese in bowl and toss to coat with dressing. Cover and chill at least 1 hour in the refrigerator. Toss with additional milk if the salad seems a little dry.


Enjoy this Bacon Ranch Pasta Salad!

Up Next:

Pesto Pasta Salad Recipe – Always A Favorite!

Be sure to follow us on Foodgasm on Pinterest for more great recipes.