Fried Dill Pickle Spears – A Deep South Favorite

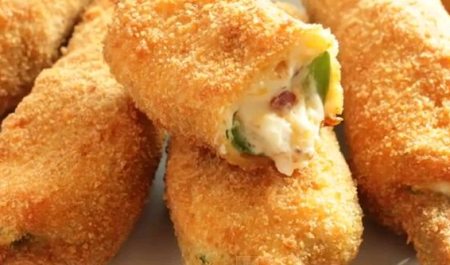
This recipe for Fried Dill Pickle Spears is a grand ole Southern recipe that is going to be on my menu one weekend this fall.


As soon as football season starts I’ll invite over my couchgatin’ friends and we’ll munch down during the game.

I’ll have a lot of Ranch dressing for dipping!

Be sure to Follow Foodgasm Recipes on Pinterest for more great recipes!

Fried Dill Pickle Spears
Prep Time
15 mins
Cook Time
10 mins
Total Time
25 mins
 

Fried Dill Pickle Spears are a great appetizer in the southern tradition!

Course: Appetizer
Cuisine: American
Keyword: Fried Dill Pickle Spears
Servings: 6
Calories: 325 kcal
Ingredients
  • 1 jar dill pickle spears
  • 1 cup flour
  • ½ cup plain yellow cornmeal
  • 1 tablespoon seasoned salt
  • 1 cup milk
  • Vegetable Oil to cook in
  • Ranch Dressing for dipping
Instructions
  1. Pour vegetable oil to a depth of at least ½ inch in medium-sized skillet and place over medium-high heat. Drain pickles and place spears on a paper towel-lined plate to absorb moisture while you prepare the breading.

  2. Place cornmeal in a small bowl. Add ½ cup flour and seasoned salt. Stir until well combined. In a separate bowl, pour the remaining flour and place milk in a third bowl.

  3. Using your hands, dip a pickle into milk, then flour, then milk, then cornmeal breading. Repeat until all pickles are breaded.
  4. Carefully place pickles into hot oil and cook until browned, stirring once if needed, about ten minutes.
  5. Remove from skillet and place on a paper towel-lined plate. Allow cooling for a few minutes before serving with ranch dressing.


Enjoy this recipe for Fried Dill Pickle Spears!

Up Next:

Creamy Jalapeno Dip

Be sure to Follow Foodgasm Recipes on Pinterest for more great recipes!

Bloomin’ Onion Bread – Delicious!

This Bloomin’ Onion Bread recipe obviously came about from the Outback Steak House bloomin’ onion. The difference, of course, is this is bread.


Bloomin’ Onion Bread has cheese stuffed in every crack and is cut just like the Onion from Outback.

This recipe makes enough to feed a small army. Which makes it a good candidate recipe for get-togethers with friends.

It’s a fun way to serve bread because everyone can just pull off a piece of cheesy onion bread.

This would be a great appetizer or bread for a meal.

Be sure to Follow Foodgasm Recipes on Pinterest for more great recipes!

Bloomin’ Onion Bread
Prep Time
30 mins
Cook Time
25 mins
Total Time
55 mins
 

Bloomin' Onion Bread is a copycat of the Bloomin' Onion except in a bread format. Delicious! 

Course: Side Dish
Cuisine: American
Keyword: Bloomin' Onion Bread
Servings: 6
Calories: 240 kcal
Ingredients
  • 1 unsliced loaf sourdough bread
  • 12-16 ounces Monterey Jack cheese thinly sliced
  • 1/2 cup butter melted
  • 1/2 cup finely diced green onion
  • 2 teaspoons poppy seeds
Instructions
  1. Preheat oven to 350 degrees.
  2. Cut the bread lengthwise and widthwise without cutting through the bottom crust. This can be a little tricky going the second way but the bread is very forgiving.
  3. Place on a foil-lined baking sheet. Insert cheese slices between cuts. Combine butter, onion, and poppy seeds. Drizzle over bread. Wrap in foil; place on a baking sheet. Bake at 350 degrees for 15 minutes.
  4. Unwrap the bread and bake 10 more minutes, or until cheese is melted.


Enjoy!

Up Next:

Peanut Butter Chocolate Bars

Be sure to Follow Foodgasm Recipes on Pinterest for more great recipes!

Ham and Cheese Sliders & Poppy Seed Butter Sauce

These Ham and Cheese sliders are simple and crowd-pleasing sandwiches. Ham and melted cheese topped with a poppy seed butter sauce.


They’re versatile too. Perfect for lunch or even dinner. They’re ideal party fare. What about that Saturday afternoon football game?

I know what you are thinking…ham and cheese sliders; does that really require a recipe?

The answer is YES it does. Sure you have your classic ham and cheese sandwich as the base of the recipe but then you top it with a flavorful poppy seed sauce.

The sauce is the key.

It’s a combination of Worcestershire sauce, onion, mustard, and butter that makes these anything but ordinary.

These can be made ahead for a party and are kid-friendly because they are small and familiar.

Be sure to Follow Foodgasm Recipes on Pinterest for more great recipes!

Ham and Cheese Sliders
Prep Time
30 mins
Cook Time
15 mins
Total Time
45 mins
 

These Ham and Cheese sliders are perfect for the big game. Easy to make and delicious!

Course: Appetizer
Cuisine: American
Keyword: Ham and Cheese Sliders
Servings: 6
Calories: 360 kcal
Ingredients
  • 24 white dinner rolls
  • 24 pieces honey ham
  • 24 small slices Swiss cheese
  • 1/2  cup mayonnaise
  • 1/2  cup miracle whip
Poppy seed sauce:
  • 1 Tablespoon poppy seed
  • Tablespoons yellow mustard
  • ½ cup butter melted
  • 1 Tablespoon minced onion
  • ½ teaspoon Worcestershire sauce
Instructions
  1. In a small bowl, mix together mayonnaise and miracle whip. Spread onto both sides of the center of each roll. Place a slice of ham and a slice of Swiss inside of each roll. Close rolls and place them into a large baking dish or heavy cookie sheet. Place very close together.
  2. In a medium bowl, whisk together all of the poppy seed sauce ingredients. Pour evenly over all of the sandwiches.
  3. You do not have to use all of the sauce! Just use enough to cover the tops. Let sit 10 minutes or until butter sets slightly. Cover with foil and bake at 350 degrees for 12-15 minutes or until cheese is melted. Uncover and cook for 2 additional minutes or until tops are slightly brown and crispy.
  4. Serve warm.
Recipe Notes

Note: Sandwiches can be assembled ahead of time. I don't like to do it more than a day ahead because they can get soggy from the mayo mixture.


Enjoy!

Up Next: 

Spicy Pickled Eggs Recipe – General Store Quality

Be sure to Follow Foodgasm Recipes on Pinterest for more great recipes!

Oven Baked Sausage Balls – Really Easy

These are Really Easy Oven Baked Sausage Balls. Just a pound of breakfast sausage and some Bisquick along with some seasonings and you have party fare.


Very easy to make and delicious!

Good Sunday Football fare!

People LOVE these. I think they are fine but everyone gobbles them up and raves so all I can do is continue making them.

I love that they can be made a day ahead – reheated. Great hot, warm, room temp, cold – doesn’t matter so they are very versatile.

Be sure to Follow Foodgasm Recipes on Pinterest for more great recipes!

Really Easy Oven Baked Sausage Balls
Ingredients
  • 1 lb. breakfast sausage not the hot this time.
  • 2 cup Bisquick baking mix
  • 1 8 oz. package extra sharp cheddar cheese shredded
  • 1/4 cup finely diced onion
  • 1/4 cup finely diced celery
  • 1/2 tsp. garlic powder
Instructions
  1. Combine all the above ingredients very well by hand until it has all come together. Roll into 1" balls and place on a lightly greased cookie sheet. Bake at 350 degrees for 12-15 minutes.
  2. Serve with a side of mustard.


Here’s a recipe for green chile dip that I like to serve with these sausage balls.

Easy Green Chile Dip

Ingredients

1 8-ounce container sour cream
1/2 cup Stubb’s Green Chile Marinade
A pinch each of salt and pepper

Directions

Mix together the dip by combining the sour cream and marinade in a medium bowl, stirring to combine.

Season to taste with salt and pepper.

Enjoy these Oven Baked Sausage Balls!

Up Next: 

Old Fashioned Chocolate Meringue Pie

Be sure to Follow Foodgasm Recipes on Pinterest for more great recipes!


Cinnamon Pecans – These Are Addictive!

You’ll definitely want to add this Cinnamon Pecans Recipe to your must-make list for the holidays. Perfect for sharing with friends, too!


Cinnamon Pecans make an excellent nibble to have on hand when entertaining or for wrapping up as gifts as a hostess thank you, to toss into a goodie basket for out of town guests, or to give to friends, teachers, and neighbors over the holidays.

I warn you though, they are super addictive!

Be sure to Follow Foodgasm Recipes on Pinterest for more great recipes!

Cinnamon Pecans
Prep Time
10 mins
Cook Time
5 mins
Total Time
15 mins
 

A really quick, easy and delicious snack that's suitable for any occasion. 

Course: Appetizer
Cuisine: American
Servings: 4
Calories: 320 kcal
Ingredients
  • 3 cups whole pecans shelled and cleaned
  • ¾ cup granulated sugar
  • 1 tablespoon ground cinnamon
  • ¼ cup water
Instructions
  1. Add all ingredients to a large (10 - 12-inch) skillet over medium-low heat.
  2. Stir to mix all ingredients together and then stir continuously as the sugar begins to melt, making sure to coat pecan well.
  3. Cook until pecans have begun to toast lightly, about five minutes and then remove from heat. Pour onto a baking sheet lined with parchment paper to cool.
  4. Allow to cool completely before serving or storing in an airtight container for gifting.
Recipe Notes

Notes: Other nuts may be substituted in place of pecans, such as almonds, walnuts, and cashews.


Enjoy!

Up Next:

Best Banana Bread Ever

Be sure to Follow Foodgasm Recipes on Pinterest for more great recipes!

Crock Pot Beef Fajitas – Quick, Easy, Delicious!

Crock Pot Beef Fajitas are easy and inexpensive. Fajitas are a healthy eating alternative that grew from the need to make food that was cheap and palatable. This popular Tex-Mex cuisine originally referred to the beef cut that was used to prepare this dish also called skirt steak.

Crock Pot Beef Fajitas

Today fajita recipes are being prepared using varieties of meats like pork, chicken, and shrimp, among others.

The meat is typically cooked along with bell peppers and onions, and popularly used condiments include sour cream, shredded lettuce, cheese, pico de gallo, guacamole, and salsa.

This recipe makes the cooks life simpler. The fajita ingredients are thrown in the crock pot and allowed to cook without any attention!

Be sure to Follow Foodgasm Recipes on Pinterest for more great recipes!

Crock Pot Beef Fajitas
Prep Time
30 mins
Cook Time
4 hrs
Total Time
4 hrs 30 mins
 

I love fajitas and this crock pot beef fajitas version is one of my favorites! 

Course: Main Course
Cuisine: Mexican
Keyword: Crock Pot Beef Fajitas
Servings: 6
Calories: 375 kcal
Ingredients
  • 1-1/2 lb Flank Steak
  • 2 Tbsp Vegetable Oil
  • 3 Red Bell Peppers cut into 1/3” strips
  • 2 Large Yellow Onions sliced into half moons about the same thickness as the peppers
  • 6 Cloves Garlic chopped
  • 8 oz can Diced Tomatoes with Chilies
  • 1 Tbsp Chili Powder
  • 1 tsp Cumin
  • 1 tsp Granulated Garlic
  • 1 tsp Granulated Onion
  • 1 tsp Paprika
  • 1/2 tsp Ground Coriander
  • 1/2 tsp Oregano
  • Salt and Pepper to taste
Instructions
  1. Preheat a large skillet over high heat, add the oil and allow it to get nice and hot. Season your steak on both sides with salt and pepper and sear it in the hot skillet for about 3 minutes on each side.
  2. Meanwhile, in a very large bowl, toss together the onions, peppers, garlic, all the spices, diced tomatoes and chilies and salt and pepper.
  3. Place half of the veggie mixture in the bottom of your slow cooker pot, top with the seared steak and tumble over the remaining veggie mixture.
  4. Cook on high for about 3 to 4 hours or low for about 6 to 8.
  5. When ready to serve, lift the steak from the pot, slice into thin slices against the grain and add it back in the pot.
  6. Serve with tortillas and your favorite toppings.

Be sure to Follow Foodgasm Recipes on Pinterest for more great recipes!

Easy Grilled Shrimp – Great Barbecue Menu Idea

This quick and Easy Grilled Shrimp recipe is perfect for lovers of spicy food. It has the heat, but still lets the sweet and juicy nature of fresh shrimp shine through.


The shrimp marinate in a paste of garlic and olive oil with just the right amount of cayenne pepper.

Several squeezes of fresh lemon juice provide the finishing tang to this perfect barbecue menu idea.

Be sure to Follow Foodgasm Recipes on Pinterest for more great recipes!

Easy Grilled Shrimp
Prep Time
15 mins
Cook Time
5 mins
Total Time
20 mins
 

This Easy Grilled Shrimp recipe is the perfect appetizer for your next backyard BBQ!

Course: Appetizer
Cuisine: American
Keyword: Easy Grilled Shrimp
Servings: 6
Calories: 225 kcal
Ingredients
  • 2 pounds large shrimp peeled and deveined
  • 3 large cloves garlic
  • 1 tablespoon kosher salt
  • 1/2 teaspoon cayenne pepper
  • juice from 1 large lemon at least 1 tablespoon
  • 1 teaspoon paprika
  • 2 tablespoons olive oil
  • 1 tablespoon fresh parsley chopped
Instructions
  1. Light a charcoal barbecue or heat a gas grill. Lightly oil the grate.
  2. In a small bowl, smash the cloves of garlic with the kosher salt. Add the cayenne pepper and paprika, then add the lemon juice. Stir in the olive oil and mix the ingredients until you have a paste
  3. Toss the cleaned shrimp with the garlic pepper paste - make sure all the shrimp are evenly coated.
  4. Grill the shrimp until they are just cooked through, a couple of minutes on each side.
  5. Sprinkle them with the chopped parsley and serve hot with lemon wedges.


Good To Know About Easy Grilled Shrimp

It isn’t always barbecue weather when the craving for spicy shrimp strikes. These shrimp can be nicely grilled on an electric grill, such as a George Foreman, and do equally as well in your oven broiler.

If you broil them, keep an eye on them so that the heat from above doesn’t burn their tails.

Food For Thought – If you like everything about this recipe except the spice, just omit the cayenne pepper. Or you can tone it down by eliminating the cayenne and adding a few grinds of freshly cracked black pepper.

Up Next:

Marinated Pork Tenderloin – Easy and Delicious!

Be sure to Follow Foodgasm Recipes on Pinterest for more great recipes!

Pesto Pasta Salad Recipe – Always A Favorite!

This Pesto Pasta Salad Recipe is delicious served warm or cold! Made with pasta, fresh pesto, tomatoes, onions, and cheese, it’s always a favorite.

Pesto Pasta Salad Recipe

It’s ready in just a few minutes, which makes it great as a make ahead side dish for the summer.

I love throwing in the toasted sunflower seeds for extra crunch. So good!

Be sure to follow Foodgasm Recipes on Pinterest for more great recipes.

Pesto Pasta Salad Recipe
Prep Time
20 mins
Cook Time
12 mins
Total Time
32 mins
 

This Pesto Pasta Salad Recipe is very easy to make even with the homemade pesto sauce!

Course: Salad
Cuisine: Italian
Keyword: Pesto Pasta Salad Recipe
Servings: 4
Calories: 280 kcal
Ingredients
  • 1 16-ounce package bowtie pasta
  • 1 pint grape tomatoes halved
  • ½ red onion diced
  • 1 8-ounce package feta cheese, crumbled or Parmesan cheese, chunks
  • ¼ cup sunflower seeds
For the Pesto:
  • 4 cups fresh basil
  • 2-3 cloves garlic
  • ¼ cup sunflower seeds
  • ½ teaspoon salt
  • ¾ cup olive oil
  • ¾ cup Parmesan cheese
Instructions
  1. Bring pasta to boil in large stockpot over medium heat. Cook according to package instructions. Remove from heat and pour through a strainer when cooked. Pour into a large mixing bowl.
  2. Add grape tomatoes, onion, feta cheese and sunflower seeds.
  3. Make pesto by adding all ingredients to a food processor or blender until smooth. Pour over pasta and stir until well-combined.
  4. Serve warm or store in an airtight container and store in the refrigerator. Bring to room temperature to serve.

Enjoy This Pesto Pasta Salad Recipe!

More recipes you might enjoy.

Bacon Ranch Pasta Salad
Chinese Chicken Salad
Bacon Ranch Pasta Salad

Be sure to follow Foodgasm Recipes on Pinterest for more great recipes.

Jalapeno Poppers

This Jalapeno Poppers recipe is my favorite appetizer recipe without a doubt. It is the one my friends and family ask for most often.

Jalapeno Poppers

It’s easy to make these awesome jalapeno poppers stuffed with cream cheese and shredded cheese and BACON!!

Perfect appetizer for parties, football games or just as a snack for the kids.

Be sure to follow Foodgasm Recipes on Pinterest for more great recipes.

Jalapeno Poppers
Prep Time
30 mins
Cook Time
3 mins
Drying time
20 mins
Total Time
33 mins
 

Very easy to make and could well be the big hit at your get-together!

Course: Appetizer
Cuisine: Mexican
Keyword: Jalapeno Poppers
Servings: 4
Calories: 160 kcal
Ingredients
  • 8 jalapeño peppers
  • 8 oz cream cheese softened
  • 1/4 cup shredded co-jack cheese
  • 4-5 slices bacon
  • 2 eggs
  • 1/4 cup milk
  • 1/2 cup all-purpose flour
  • 2 cups dry breadcrumbs
  • oil for frying
Instructions
  1. Start by frying the bacon. When nice and crispy, drain on paper towels and let cool.
  2. To prep the peppers, cut in half lengthwise and scoop out the seeds and veins using a spoon. Use gloves for this is you have open sores or sensitive skin on your hands. Set aside.
  3. In a medium bowl, combine the cream and shredded cheese. Add in crumbled bacon and stir to mix well. Put about 1 tablespoon of filling in each pepper half. Press down firmly into the pepper so there are no air pockets. Mound the filling up slightly. Continue with the rest of the pepper halves.
  4. In a small bowl add the flour. In another bowl add the breadcrumbs. In a third bowl, combine the eggs and milk.
  5. Start the breading process by dipping the poppers into the egg, then the flour. Shake off excess flour and put back into the egg mixture. Let excess drip off and then dredge in the breadcrumbs.
  6. Set onto a plate and continue with the rest of the peppers.
  7. Let dry for about 10 minutes and then bread again by dipping into the egg again and back into the breadcrumbs. Again, let dry for 10 minutes before frying.
  8. Heat oil in a heavy bottomed pan and heat over medium-high heat until oil reaches 350*F. When the oil is ready, slowly and carefully put a couple poppers into the oil and fry for 2-3 minutes or until golden brown.
  9. Remove to a paper towel lined plate to drain of excess oil. Serve with ranch dressing or your favorite dipping sauce. Makes 16 poppers. Enjoy!!

Tips and Tidbits

Be careful when dealing with the jalapeno peppers; they can cause burns if handled improperly. The best option is to wear disposable gloves while cutting, seeding and stuffing them.

Be sure to follow Foodgasm Recipes on Pinterest for more great recipes.

Old Fashioned Deviled Eggs – Just Like Mom’s

Make Old Fashioned Deviled Eggs, “just like mom used to make”! Classic, basic, traditional deviled eggs, that are perfect for every occasion.

Using simple ingredients you make a traditional, old fashioned deviled egg with a creamy filling that tastes delicious and will keep guests coming back for more!

Without any special tools and using mayonnaise, mustard and sometimes relish, paprika or even with bacon or crab these deviled eggs are the perfect appetizer all year round.

Be sure to Follow Foodgasm Recipes on Pinterest for more great recipes!

Old Fashioned Deviled Eggs
Prep Time
25 mins
Total Time
25 mins
 

Deviled eggs just like my Mom and Grandmom used to make!

Course: Appetizer
Cuisine: American
Keyword: Old Fashioned Deviled Eggs
Servings: 6
Calories: 180 kcal
Ingredients
  • 6 Hard Boiled Eggs – Peeled
  • 3 1/2 Tbs. mayonnaise
  • 1/2 tsp dry mustard
  • 1/4 tsp salt – or to taste
  • 1/8 tsp ground black pepper – or to taste
  • 1-2 Tbs. sweet relish or sweet pickle juice optional
  • Paprika -for dusting – optional
Instructions
  1. Slice eggs lengthwise. Into a bowl, pop out the yolk. See video.
  2. Using the tines of a fork, mash the yolks until very fine.
  3. Combine the salt, pepper and dry mustard. Add to the mayonnaise and mix well. If using the pickle juice, add it to the mayonnaise mixture.
  4. Add the mayonnaise mixture to the mashed yolks and mix well.
  5. If desired, stir in the relish and mix well.
  6. Using a spoon, fill each egg with the yolk mixture. Pile it up slightly, but not too much or you’ll run out. With a fork, fluff the yolk into peeks or swirls. Sprinkle with paprika if desired.

Enjoy!

Tips and Tidbits About Old Fashioned Deviled Eggs

Another option for stuffing the eggs is to put the yolk mixture into a piping bag fitted with a star tip and pipe it into the eggs. This makes a pretty presentation.

Up Next:

Secret Ingredient Deviled Eggs

Be sure to Follow Foodgasm Recipes on Pinterest for more great recipes!