Chicken Spaghetti – Easy To Make, Tastes Great

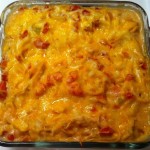
Chicken Spaghetti is a great comfort dish. I’ve forgotten where I got the original recipe but I tweaked it to fit my taste. My friends request this when we have pot-luck dinners.

Chicken Spaghetti

Garnish with freshly grated Parmesan cheese and serve with a salad and hot garlic bread.

You’ll be a hit with everyone.

Be sure to follow Foodgasm Recipes on Pinterest for more great recipes.

Chicken Spaghetti
Prep Time
20 mins
Cook Time
1 hr 40 mins
Total Time
2 hrs
 

This Chicken Spaghetti dish is so simple to make and yet the taste is great! 

Course: Main Course
Cuisine: Italian
Keyword: Chicken Spaghetti
Servings: 6
Calories: 360 kcal
Ingredients
  • 1 8 ounce package spaghetti
  • 2 cups boneless chicken breast half cooked and diced
  • 1 4 ounce jar chopped pimento peppers
  • 1 10.75 ounce can condensed cream of mushroom soup
  • 1/2 green bell pepper diced
  • 1 1/2 cups shredded processed American cheese
  • Preheat oven to 250 degrees F 120 degrees C.
Instructions
  1. Bring a large pot of lightly salted water to a boil. Add pasta and cook for 8 to 10 minutes or until al dente; drain.
  2. Mix together in large bowl: cooked spaghetti, diced chicken, pimentos, mushroom soup, bell peppers and cheese. Pour into a large casserole dish and bake for 90 minutes in a preheated oven.
  3. Serve immediately.
  4. Chicken Spaghetti is Cajun-inspired. Try adding some Cajun seasoning if you want a little kick.

Enjoy!

Be sure to follow Foodgasm Recipes on Pinterest for more great recipes.

Spinach and Cheese Manicotti

This Spinach and Cheese Manicotti is a great make-ahead party recipe. I like to spice it up with Italian sausage and crushed red pepper.


I have also subbed fresh basil for the parsley and fresh minced garlic in the ricotta instead of the powder.

I serve it with Italian bread and a tossed salad.

Whether you make those alterations or not this dish is restaurant quality. It can be made ahead and kept in the refrigerator overnight. Very filling.

Be sure to follow Foodgasm Recipes on Pinterest for more great recipes.

Spinach and Cheese Manicotti
Prep Time
30 mins
Cook Time
1 hr
Total Time
1 hr 30 mins
 

Very easy to make but a great Italian dish your family will surely enjoy! 

Course: Main Course
Cuisine: Italian
Keyword: Spinach and Cheese Manicotti
Servings: 6
Calories: 325 kcal
Ingredients
  • 1 10 ounce package frozen spinach, thawed completely & squeezed dry
  • 8 ounces shredded mozzarella cheese
  • 1/2 c. grated Parmesan cheese
  • 15 ounces ricotta cheese
  • 8 slices mozzarella cheese
  • 2 large eggs
  • 1/2 teaspoon salt
  • 1/2 teaspoon freshly ground black pepper
  • 1 box 12 to 14 shells manicotti noodles, uncooked
  • 3 to 4 cups marinara sauce
  • 8 ounces shredded mozzarella cheese
Instructions
  1. Preheat oven to 350 degrees F.
  2. In a large bowl, mix spinach, cheeses, eggs, salt and pepper. Stir together until well blended. Place about 1 1/2 cups of marinara sauce in a 9×13-inch pan. Spread it around to cover the bottom.
  3. Place the mixed filling into a plastic bag. You can use either a frosting piping bag or a gallon zip bag. Snip the corner, gather the top and squeeze the filling into the corner. Hold an uncooked manicotti shell in your hand and squeeze the filling inside the shell. Let it overflow on both sides. Place the filled shell into the sauce-lined pan.
  4. Repeat with remaining manicotti and fill the pan with the stuffed shells.
  5. Cover the pasta with marinara sauce, using about 2 1/2 cups of sauce. Sprinkle 1/2 cup mozzarella on top. At this point, you can cover with foil and refrigerate until you’re ready to bake, or you can cover with foil and place it in the oven immediately.
  6. Bake, covered with foil, 50 minutes. Remove foil and bake an additional 10 minutes.


Enjoy!

Up Next:

Chicken Spaghetti – Easy To Make, Tastes Great

Be sure to follow Foodgasm Recipes on Pinterest for more great recipes.

Cracker Barrel Copycat Chicken and Dumplings

Who doesn’t love a bowl of piping-hot dumplings? These Cracker Barrel Copycat Chicken and Dumplings are pillows of starchy goodness.  They hit the spot when you are looking for something that makes you feel full and warm.

Interestingly, these are actually served without chicken at the restaurant when ordered as a side dish.

This version, however, does have chicken and chicken broth for a more traditional style chicken and dumplings.

This dish isn’t difficult to make and can be put together rather quickly.

Be sure to Like Foodgasm Recipes on Facebook and Foodgasm on Pinterest for more great recipes.

Cracker Barrel Copycat Chicken and Dumplings
Prep Time
20 mins
Cook Time
35 mins
Total Time
55 mins
 

This Cracker Barrel Copycat Chicken and Dumplings recipe is closer to Cracker Barrels than any other I've tried!

Course: Main Course
Cuisine: American
Keyword: Cracker Barrel Copycat Chicken and Dumplings
Servings: 6
Calories: 295 kcal
Ingredients
  • 1 3 -6 lb frying chickens (any whole chicken will do)
  • 2 quarts water
  • 2 teaspoons salt
  • 1/2 teaspoon pepper I use coarse ground and double it
  • 2 cups all-purpose flour
  • 1/2 teaspoon baking soda
  • 1/2 teaspoon salt
  • 3 tablespoons shortening I use Crisco sticks
  • 3/4 cup buttermilk
Instructions
  1. Place the chicken in a Dutch oven. Add the water and 2 teaspoons salt. Bring to a boil.
  2. Cover, reduce the heat, and simmer for 1 hour or until the chicken is tender (It should almost fall off bone).
  3. Remove the chicken from the broth and cool. Bone the chicken and cut the meat into bite-sized pieces.
  4. Bring the broth to a boil and add pepper.
  5. Combine the flour, baking soda, and salt. Cut in the shortening. Add the buttermilk, stirring with a fork until moistened.
  6. Knead the dough 4 to 5 times (never done), and pat to 1/2-inch pieces and drop into the boiling broth (I do not pat it out, just pinch off pieces). Reduce the heat to medium-low, and cook for about 8 to 10 minutes, stirring occasionally.
  7. Add the chicken back in and serve it up.


Enjoy!

Up Next: 

KFC Copycat Coleslaw

Be sure to Like Foodgasm Recipes on Facebook and Foodgasm on Pinterest for more great recipes.

Snickerdoodle Bread – Easy To Make, Tastes Great

This Snickerdoodle Bread took no more than 10 minutes to whip up and within no time, the house was smelling fabulous.

Snickerdoodle Bread

It’s no secret that I love me a good quick bread. They’re just that – quick – and they’re so darn easy that there’s just no excuse not to make them.

Like the Snickerdoodle cookie it has a crispy cinnamon sugar topping with a sweet, buttery interior. It also has another layer of cinnamony goodness with cinnamon in the batter and loads of luscious cinnamon chips.

It has the tangy sweetness of a Snickerdoodle cookie with a moist, bet-you-can’t-eat-just-one-slice, interior.

Be sure to Follow Foodgasm Recipes on Pinterest for more great recipes!

Snickerdoodle Bread
Prep Time
20 mins
Cook Time
40 mins
Resting Time
10 mins
Total Time
1 hr
 

Snickerdoodle Bread is very similar to the cookie but easier to make. Very good!

Course: Dessert
Cuisine: American
Keyword: Snickerdoodle Bread
Servings: 6
Calories: 360 kcal
Ingredients
  • 3 cups all purpose flour
  • 2 teaspoons baking powder
  • 1/2 teaspoon salt
  • 2 teaspoons cinnamon
  • 1 cup butter softened
  • 2 cup sugar
  • 4 eggs
  • 2 teaspoons vanilla
  • 1 cup sour cream
  • 1 1/2 cups cinnamon chips 1 pkg. Hershey's
  • 2 tablespoons flour
  • 2 tablespoons sugar
  • 2 teaspoons cinnamon
Instructions
  1. Preheat oven to 350º Spray the bottom of five mini loaf pans (5 3/4 x 3 1/4 x 2 ¼) with cooking spray with flour.
  2. In a medium bowl, whisk together 3 cups flour, baking powder, salt and cinnamon. Set aside.
  3. In a large mixing bowl, cream together butter and 2 cups sugar, until fluffy, about two minutes. Add eggs one at a time mixing well after each addition. Add vanilla and sour cream and mix to combine. Add flour mixture and mix just until combine. Do not over mix.
  4. Coat the cinnamon chips with 2 tablespoons flour and stir into batter.
  5. Spoon batter into greased pans (Don't fill more than 2/3 full.)
  6. Combine 2 tablespoons sugar and 2 teaspoons cinnamon and sprinkle over the top of the batter in the pans.
  7. Bake for 35 to 40 minutes until a toothpick inserted into a crack in the center of the loaf comes clean.
  8. Remove from oven and let cool 10 minutes before removing from pan. Remove from pan and let cool completely before serving.

Be sure to Follow Foodgasm Recipes on Pinterest for more great recipes!

Dr Pepper Slow Cooker Roast Beef Recipe

The minute I heard about a Dr Pepper Slow Cooker Roast Beef Recipe I knew I had to try it. Dr Pepper in a roast is just to intriguing! A search for recipes turned up several.

Dr Pepper Slow Cooker Roast Beef Recipe

This is the one I chose and of course I had to tweak it a bit. I almost never go by a recipe exactly.

My conclusion: Compared to all the other roasts from a crockpot I’ve eaten, this is the best one.

I cooked it on the weekend so it wouldn’t be drying out all afternoon between lunch and dinner, but I could time it just right to get ready at dinnertime.

My favorite thing about this recipe is the gravy it makes. You almost certainly have to serve mashed potatoes with this dish to sop up the gravy!

Be sure to Follow Foodgasm Recipes on Pinterest for more great recipes!

Dr Pepper Slow Cooker Roast Beef Recipe
Prep Time
30 mins
Cook Time
7 hrs
Total Time
7 hrs 30 mins
 

A Dr Pepper Slow Cooker Roast Beef Recipe is just to fascinating to pass up! Turns out it's delicious and deserves a place in your roast beef rotation! 

Course: Main Course
Cuisine: American
Keyword: Dr Pepper Slow Cooker Roast Beef Recipe
Servings: 6
Ingredients
  • 4 lb Chuck Roast
  • 1 can Campbell’s cream of mushroom soup
  • 2 cans Campbell’s cream of potato soup
  • 2 cups Dr. Pepper
  • 1 package Lipton onion soup mix
  • 1/2 - 1 tsp Tony’s Creole Seasoning depending on how spicy you want it
Instructions
  1. Place beef roast in slow cooker.
  2. Add in all other ingredients.
  3. Cook for 7 hours on low.
  4. Serve warm with with the gravy over mashed potatoes.

Be sure to Follow Foodgasm Recipes on Pinterest for more great recipes!

Easy Zucchini Fritters – Easy, Light, Crispy!

You should try this Easy Zucchini Fritters recipe if you’ve got some extra squash around.  (Even if you don’t have any extra around, you can usually find it at the grocery store without any problem.)

Easy Zucchini Fritters

Zucchini Squash is a staple in many Southern gardens.  It’s usually pretty easy to grow and rather prolific.  That means that there is usually some extra around.

These are light and crispy and incredibly easy to make.   If the plain version doesn’t suit your fancy, try adding about 1/2 teaspoon of curry powder to give them a kick.  I love them both ways!

Be sure to Follow Foodgasm Recipes on Pinterest for more great recipes!

Easy Zucchini Fritters Recipe
Prep Time
30 mins
Cook Time
5 mins
Total Time
35 mins
 

This Easy Zucchini Fritters Recipe makes delicious fritters and is really handy during zucchini season. 

Course: Side Dish
Cuisine: American
Keyword: Easy Zuchinni Fritters Recipe
Servings: 6
Calories: 190 kcal
Ingredients
  • 1 1/2 pounds zucchini grated
  • 1 teaspoon salt
  • 1/4 cup all-purpose flour
  • 1/4 cup grated Parmesan cheese
  • 1 large egg beaten
  • 2 cloves garlic minced
  • kosher salt and ground black pepper to taste
  • 2 tablespoons olive oil
Instructions
  1. Toss zucchini and salt together in a large colander and place in sink to drain for 10 minutes.
  2. Put zucchini in the middle of a piece of cheesecloth; wrap cheesecloth around zucchini and squeeze to drain as much moisture from zucchini as possible.
  3. Mix flour, Parmesan cheese, egg, garlic, kosher salt, and pepper together in a large bowl.
  4. Heat olive oil in a large skillet over medium-high heat.
  5. Scoop batter by the tablespoon into the hot skillet and fry until golden brown, about 2 minutes per side.

Be sure to Follow Foodgasm Recipes on Pinterest for more great recipes!

Caramel Apple Cheesecake Bars

These Caramel Apple Cheesecake Bars have a shortbread crust, a cheesecake layer, and are topped with diced cinnamon apples and a sweet streusel topping.


I’ve been making this Paula Deen recipe for a couple of years now. They’ve always been good but they always needed a little more cheesecake filling in my opinion.

My thinking is that more filling would match the thick crust and ample streusel topping. So I increased the cheesecake filling and these are even better than I remember.

It may seem like a lot of steps but they actually come together quickly and are well worth your time.

Be sure to follow Foodgasm Recipes on Pinterest for more great recipes.

Caramel Apple Cheesecake Bars
Prep Time
30 mins
Cook Time
1 hr
Total Time
1 hr 30 mins
 

These Caramel Apple Cheesecake Bars are the perfect fall dessert. However, it's good any time of year! 

Course: Dessert
Cuisine: American
Keyword: Caramel Apple Cheesecake Bars
Servings: 6
Calories: 360 kcal
Ingredients
Crust:
  • 2 cups all-purpose flour
  • 1/2 cup firmly packed brown sugar
  • 1 cup 2 sticks butter, softened
Cheesecake Filling:
  • 3 8-ounce packages cream cheese, softened
  • 3/4 cup sugar plus 2 tablespoons, divided
  • 3 large eggs
  • 1 1/2 teaspoons vanilla extract
Apples:
  • 3 Granny Smith apples peeled, cored and finely chopped
  • 1/2 teaspoon ground cinnamon
  • 1/4 teaspoon ground nutmeg
Streusel Topping:
  • 1 cup firmly packed brown sugar
  • 1 cup all-purpose flour
  • 1/2 cup quick cooking oats
  • 1/2 cup 1 stick butter, softened
Drizzle:
  • 1/2 cup caramel topping for drizzling
Instructions
  1. Preheat oven to 350 degrees F.
  2. In a medium bowl, combine flour and brown sugar. Cut in butter with a pastry blender (or 2 forks) until mixture is crumbly. Press evenly into a 9x13 baking pan lined with heavy-duty aluminum foil. Bake 15 minutes or until lightly browned.
  3. In a large bowl, beat cream cheese with 3/4 cup sugar in an electric mixer at medium speed until smooth. Then add eggs, 1 at a time, and vanilla. Stir to combine. Pour over warm crust.
  4. In a small bowl, stir together chopped apples, remaining 2 tablespoons sugar, cinnamon, and nutmeg. Spoon evenly over cream cheese mixture.
  5. For the streusel topping: In a small bowl, combine all ingredients. I like to really combine it by using my clean hands to thoroughly combine the butter into the mixture.
  6. Sprinkle Streusel topping over apples. Bake 40-45 minutes, or until filling is set.
  7. Drizzle with caramel topping and let cool. Serve cold and enjoy!


Enjoy these Caramel Apple Cheesecake Bars!

Up Next: 

Peanut Butter Chocolate Bars

Be sure to follow Foodgasm Recipes on Pinterest for more great recipes.

Peanut Butter Chocolate Bars

These Peanut Butter Chocolate Bars have layers of buttery cake mix and a coconut chocolate creamy filling. How could this not be heaven?


Peanut Butter, chocolate, cake mix… that’s it! I have been making these for a couple of years ever since I had them at my friend’s chocolate party.

This is very, very rich. For me to say that is saying a lot. They are probably 10,845 Weight Watcher points! Decadent.

Be sure to Follow Foodgasm Recipes on Pinterest for more great recipes!

Peanut Butter Chocolate Bars
Prep Time
25 mins
Cook Time
25 mins
Cooling Time
30 mins
Total Time
50 mins
 

Delicious Peanut Butter Chocolate Bars that are super simple to make because they start with cake mix! 

Course: Dessert
Cuisine: American
Keyword: Peanut Butter Chocolate Bars
Servings: 6
Calories: 360 kcal
Ingredients
  • 1 18.25 package plain yellow cake mix
  • 1/2 cup butter melted
  • 1 cup creamy peanut butter
  • 2 eggs
  • 1 12 oz package semi-sweet chocolate chips
  • 1 14 ounce can sweetened condensed milk
  • 2 Tablespoons butter
  • 2 teaspoons vanilla
  • 1 cup coconut
Instructions
  1. Preheat oven to 325 degrees.
  2. Combine cake mix, melted butter, peanut butter, and eggs in a large bowl using a mixer or spoon. Press the cake mixture into a 9X13 pan reserving 1 1/2 cup of the mixture to crumble on top.
  3. In a small pot, melt chocolate chips, sweetened condensed milk, and butter. Remove from heat and stir in the vanilla and coconut.
  4. Spread chocolate mixture over the mixture pressed in the pan and then crumble the 1 1/2 cups of reserved cake mixture on top evenly.
  5. Bake for 20-25 minutes. Cool completely before cutting into bars.


Enjoy these Peanut Butter Chocolate Bars!

Up Next:

Caramel Apple Cheesecake Bars

Be sure to Follow Foodgasm Recipes on Pinterest for more great recipes!

Bloomin’ Onion Bread – Delicious!

This Bloomin’ Onion Bread recipe obviously came about from the Outback Steak House bloomin’ onion. The difference, of course, is this is bread.


Bloomin’ Onion Bread has cheese stuffed in every crack and is cut just like the Onion from Outback.

This recipe makes enough to feed a small army. Which makes it a good candidate recipe for get-togethers with friends.

It’s a fun way to serve bread because everyone can just pull off a piece of cheesy onion bread.

This would be a great appetizer or bread for a meal.

Be sure to Follow Foodgasm Recipes on Pinterest for more great recipes!

Bloomin’ Onion Bread
Prep Time
30 mins
Cook Time
25 mins
Total Time
55 mins
 

Bloomin' Onion Bread is a copycat of the Bloomin' Onion except in a bread format. Delicious! 

Course: Side Dish
Cuisine: American
Keyword: Bloomin' Onion Bread
Servings: 6
Calories: 240 kcal
Ingredients
  • 1 unsliced loaf sourdough bread
  • 12-16 ounces Monterey Jack cheese thinly sliced
  • 1/2 cup butter melted
  • 1/2 cup finely diced green onion
  • 2 teaspoons poppy seeds
Instructions
  1. Preheat oven to 350 degrees.
  2. Cut the bread lengthwise and widthwise without cutting through the bottom crust. This can be a little tricky going the second way but the bread is very forgiving.
  3. Place on a foil-lined baking sheet. Insert cheese slices between cuts. Combine butter, onion, and poppy seeds. Drizzle over bread. Wrap in foil; place on a baking sheet. Bake at 350 degrees for 15 minutes.
  4. Unwrap the bread and bake 10 more minutes, or until cheese is melted.


Enjoy!

Up Next:

Peanut Butter Chocolate Bars

Be sure to Follow Foodgasm Recipes on Pinterest for more great recipes!

Ham and Cheese Sliders & Poppy Seed Butter Sauce

These Ham and Cheese sliders are simple and crowd-pleasing sandwiches. Ham and melted cheese topped with a poppy seed butter sauce.


They’re versatile too. Perfect for lunch or even dinner. They’re ideal party fare. What about that Saturday afternoon football game?

I know what you are thinking…ham and cheese sliders; does that really require a recipe?

The answer is YES it does. Sure you have your classic ham and cheese sandwich as the base of the recipe but then you top it with a flavorful poppy seed sauce.

The sauce is the key.

It’s a combination of Worcestershire sauce, onion, mustard, and butter that makes these anything but ordinary.

These can be made ahead for a party and are kid-friendly because they are small and familiar.

Be sure to Follow Foodgasm Recipes on Pinterest for more great recipes!

Ham and Cheese Sliders
Prep Time
30 mins
Cook Time
15 mins
Total Time
45 mins
 

These Ham and Cheese sliders are perfect for the big game. Easy to make and delicious!

Course: Appetizer
Cuisine: American
Keyword: Ham and Cheese Sliders
Servings: 6
Calories: 360 kcal
Ingredients
  • 24 white dinner rolls
  • 24 pieces honey ham
  • 24 small slices Swiss cheese
  • 1/2  cup mayonnaise
  • 1/2  cup miracle whip
Poppy seed sauce:
  • 1 Tablespoon poppy seed
  • Tablespoons yellow mustard
  • ½ cup butter melted
  • 1 Tablespoon minced onion
  • ½ teaspoon Worcestershire sauce
Instructions
  1. In a small bowl, mix together mayonnaise and miracle whip. Spread onto both sides of the center of each roll. Place a slice of ham and a slice of Swiss inside of each roll. Close rolls and place them into a large baking dish or heavy cookie sheet. Place very close together.
  2. In a medium bowl, whisk together all of the poppy seed sauce ingredients. Pour evenly over all of the sandwiches.
  3. You do not have to use all of the sauce! Just use enough to cover the tops. Let sit 10 minutes or until butter sets slightly. Cover with foil and bake at 350 degrees for 12-15 minutes or until cheese is melted. Uncover and cook for 2 additional minutes or until tops are slightly brown and crispy.
  4. Serve warm.
Recipe Notes

Note: Sandwiches can be assembled ahead of time. I don't like to do it more than a day ahead because they can get soggy from the mayo mixture.


Enjoy!

Up Next: 

Spicy Pickled Eggs Recipe – General Store Quality

Be sure to Follow Foodgasm Recipes on Pinterest for more great recipes!