Cheesy Garlic Bread

Wonderful Cheesy Garlic Bread! So simply done and yet soooo good! Crusty and melts in your mouth at the same time. Do I have to say it’s my favorite bread when serving lasagna.

Cheesy Garlic Bread

This smells so good while it’s baking that normal people turn into bottomless pits while they wait for it to be ready.

Crisp on the outside and soft and bursting with flavor on the inside! Absolutely Delicious!!!

Be sure to Like Foodgasm Recipes on Facebook for more great recipes.

Cheesy Garlic Bread
Ingredients
  • 1 loaf French or Italian bread unsliced
  • 1/2 cup butter
  • 2 garlic cloves halved
  • 1 teaspoon dried parsley
  • 1/3 cup grated Parmesan cheese
Instructions
  1. Preheat oven to 375F degrees.
  2. Cut slices down the length of bread loaf at 1 inch intervals, without cutting all the way through.
  3. Rub the slices and top of loaf with cut sides of garlic.
  4. Mince the garlic.
  5. Combine the butter, garlic, parsley and Parmesan. Spread the butter mixture between the bread slices and on top of loaf.
  6. Wrap the bread in foil leaving the top partially uncovered. Bake until heated through, about 15 minutes.

Enjoy!

Be sure to Like Foodgasm Recipes on Facebook for more great recipes.

Recipe based on one by stephanie
Photo by NcMysteryShopper

Favorite Lemon Loaf

This is one of those perfect recipes that reminds me of the lemon loaf my mom used to make, only better! Sorry mom. The sweet-tart glaze perfectly complements the wonderful flavor of the loaf.

Favorite Lemon Loaf

This one’s in the tried-and-true pile.

This is soooo nummmmy!! For lemon lovers. Very good warm or cold.

Be sure to Like Foodgasm Recipes on Facebook for more great recipes.

Favorite Lemon Loaf
Ingredients
  • 1/2 cup butter or 1⁄2 cup margarine or 1⁄2 cup shortening We prefer butter
  • 1 cup sugar
  • 2 eggs
  • 1/2 cup milk 2% is fine
  • 1 1/2 cups all-purpose flour
  • 1 teaspoon baking powder
  • 1/2 teaspoon salt
  • 1 lemon rind of
Glaze
  • 1 lemon juice of
  • 1/4 cup sugar
Instructions
  1. In a large bowl, cream the butter and sugar. Add the eggs, one at a time, beating until creamy. Blend in the milk.
  2. In another bowl, mix together the flour, baking powder, salt and lemon rind. Pour into the batter. Stir to moisten.
  3. Scrape into greased 9 x 5 inch loaf pan.
  4. Bake in 350f degree oven for 55 to 60 minutes.
  5. Cool in pan for 5 minutes.
  6. Remove to rack and while still hot, with a toothpick poke holes all over the top of the loaf, and spoon glaze evenly over.
  7. Cool.
Glaze
  1. Combine the lemon juice and sugar in saucepan. Stir and heat until the sugar is dissolved. Spoon evenly over the top of the hot loaf.

Enjoy!

Be sure to Like Foodgasm Recipes on Facebook for more great recipes.

Recipe based on one by Derf
Photo by Sue Lau

Easy Make-Ahead Cloverleaf Dinner Rolls

These Easy Make-Ahead Cloverleaf Dinner Rolls are excellent! The taste is wonderful and they look absolutely beautiful. The dough is so easy to work with and they rise just fine.

Even if it’s your first time baking people will think you’ve been doing it for years.

These rolls are truly the EASIEST things you will ever bake and they are deeeelicious!

Be sure to Follow Foodgasm Recipes on Pinterest for more great recipes!

Easy Make Ahead Cloverleaf Dinner Rolls
Prep Time
30 mins
Cook Time
20 mins
Resting Time
2 hrs
Total Time
2 hrs 50 mins
 

These Easy Make Ahead Cloverleaf Rolls are truly the EASIEST things you will ever bake and they are deeeelicious!

Course: Bread
Cuisine: American
Keyword: Easy Make Ahead Cloverleaf Rolls
Servings: 6
Calories: 225 kcal
Ingredients
  • 1 cup warm water 110F
  • 2 1/2 ounce envelopes active dry yeast
  • 1/2 cup unsalted butter melted and cooled
  • 1/2 cup sugar
  • 3 eggs lightly beaten, at room temperature
  • 1 teaspoon salt
  • 5 1/2 cups all-purpose flour
Instructions
  1. In your stand mixer, place warm water to heat the bowl. When the temperature of the water reaches 110F, drain off all but one cup. Sprinkle yeast over the water and let it soften.
  2. Add room temperature melted butter, sugar, room temperature eggs, and salt.
  3. Add dough hook and run mixer on low, adding flour 1/2 cup at a time until dough comes together, adjusting flour amount if necessary, then run mixer until dough is fairly smooth.
  4. Turn dough out into an oiled bowl, cover with plastic wrap, and refrigerate for 2 hours.
  5. Turn dough out onto a lightly floured surface. Divide dough in half, then each half into 4 pieces, then each piece into thirds. Roll each piece into a log and cut into three more pieces, and roll in between lightly oiled hands into smooth balls.
  6. Place dough balls on waxed paper on a baking sheet and freeze until firm, about an hour or so. Place balls in a freezer bag, and keep frozen until needed.
  7. To prepare, grease a muffin tin and place three balls into each cup. Cover loosely with plastic wrap and let sit in a warm, draft-free place for several hours or until doubled in size.
  8. Bake at 375F for 12-15 minutes, or until golden brown.

Enjoy!

Up Next: 

Easy Home Made Dinner Rolls From Scratch

Be sure to Follow Foodgasm Recipes on Pinterest for more great recipes!

Recipe based on one by Sue Lau
Photo by Sue Lau

Quick and Easy Zucchini Bread

This Quick and Easy Zucchini Bread is delicious and sooo easy to make! It’s moist and cakey in the middle, and the crust is sweet and surprisingly crunchy.


Even zucchini-hating friends love it!

I like quick breads in general but this one especially because it’s easily thrown together in one bowl and very moist — perfect for a snack at work or school!

Be sure to Follow Foodgasm Recipes on Pinterest for more great recipes!

Quick and Easy Zucchini Bread
Prep Time
15 mins
Cook Time
1 hr
Total Time
1 hr 15 mins
 

Zucchini Bread makes a great snack anytime!

Course: Bread
Cuisine: American
Keyword: Easy Zucchini Bread
Servings: 6
Calories: 395 kcal
Ingredients
  • 2 1/2 cup sugar
  • 3 eggs
  • 3 cups flour
  • 3 teaspoons vanilla
  • 1 cup oil
  • 2 cups zucchini grated
  • 1/4 teaspoon salt
  • 1 teaspoon baking soda
  • 1/4 teaspoon baking powder
  • 1 cup nuts optional
  • 3 teaspoons cinnamon
Instructions
  1. Preheat oven to 350 degrees.
  2. Combine all ingredients. Pour into two greased loaf pans. Bake for one hour.


Enjoy this Easy Zucchini Bread!

Up Next: 

Cheese Toasts – Much Better Than Garlic Bread

Be sure to Follow Foodgasm Recipes on Pinterest for more great recipes!

Recipe based on one by Sackville
Photo by KonaKona

Beer Bread – No Yeast Required

Beer bread recipes are common but this has to be the very best one in the world! It’s very simple and yet very tasty plus you can even mix it in the baking pan. It can’t get easier than that.


This recipe makes a very hearty bread with a crunchy, buttery crust. Great with soup, makes a great sandwich or just eat it by itself!

Be sure to Like Foodgasm Recipes on Facebook for more great recipes.

Beer Bread
Prep Time
15 mins
Cook Time
1 hr
Cooling
15 mins
 

Beer Bread is quick and easy to make and requires no yeast!

Course: Bread
Cuisine: American
Keyword: Lazy Irish Beer Bread
Servings: 6
Calories: 325 kcal
Ingredients
  • 3 cups plain flour sifted
  • 3 teaspoons baking powder
  • 1 teaspoon salt
  • 1/4 cup sugar
  • 1 12 ounce can beer
  • 1/2 cup melted butter 1/4 cup will do just fine
Instructions
  1. Preheat oven to 375 degrees.
  2. Mix the dry ingredients and beer. Pour into a greased loaf pan. Pour melted butter over mixture. Bake 1 hour, remove from pan and cool for at least 15 minutes.
  3. If you prefer a softer crust (like a traditional bread) mix the butter into the batter instead of pouring it over the top.
  4. Be sure to use a sheet pan on the shelf below the pan to catch any excess butter that may drip during cooking.


Enjoy!

Up Next:

Slow Cooker Bread – Couldn’t Be Easier

Be sure to Like Foodgasm Recipes on Facebook for more great recipes.

Recipe based on one by Gerald Norman
Photo by Wildflour

Spiced Apple Loaf

Even if you’re a novice cook you can make this Spiced Apple Loaf. It’s not only a deliciously moist cake, but it’s also full of flavor. I challenge anyone not to love this recipe.

Spiced Apple Loaf

It’s best when eaten the day after it is baked.

Honestly, try this cake!! Even if you’ve always been a bit scared of baking this recipe will inspire you to try more recipes!

Be sure to Like Foodgasm Recipes on Facebook for more great recipes.

Spiced Apple Loaf
Ingredients
  • 9 ounces plain flour
  • 6 ounces sugar
  • 5 ounces soft butter
  • 3 ounces raisins
  • 1 egg
  • 1 teaspoon ground nutmeg
  • 1 teaspoon ground allspice
  • 1 -2 teaspoon ground cinnamon
  • 1 teaspoon baking powder
  • 2 -3 granny smith cooking apples
Instructions
  1. Pre-heat oven to 350 degrees. Line a 2 lb loaf tin with greaseproof paper or spray with cooking spray.
  2. Peel and core the apples, cut into chunks, place in a pan and cover with water, bring to the boil and simmer until the apples are just starting to soften. Drain and add a little sugar to taste (I prefer the apples to be quite tart). Leave to one side to cool.
  3. Put all the dry ingredients into a large bowl together and mix roughly. Next add all wet ingredients at same time, mix until all of the flour mixture is taken up.
  4. Pour into the loaf tin and cook for 1 1/4 - 1 1/2 hours until browned.
  5. When the cake is cooked, Leave it in the pan until it's cool. Then you can remove it and wrap in foil.
Recipe Notes

This cake is best left until the next day to eat (if you can wait that long!)

Enjoy!

Be sure to Like Foodgasm Recipes on Facebook for more great recipes.

Recipe based on one by Janet #6
Photo by buttercreambarbie

Ham and Cheese Muffins – Super Quick and Easy

These ham and cheese muffins are super easy to throw together and they’re so super yummy. They’re good for breakfast or lunch or a light dinner, with soup.


I like to use sharp cheddar. A nice change from the usual sweet breakfast muffin!

Make these for breakfast some morning. A meal All-In-One and so simple and easy to make.

Be sure to Follow Foodgasm Recipes on Pinterest for more great recipes!

Ham and Cheese Muffins
Prep Time
10 mins
Cook Time
15 mins
Total Time
25 mins
 

These Ham and Cheese Muffins are a great grab and go breakfast!

Course: Breakfast
Cuisine: American
Keyword: Ham and Cheese Muffins
Servings: 6
Calories: 325 kcal
Ingredients
  • 1 cup cheese grated (your favorite)
  • 2 tablespoons sugar
  • 1 egg
  • 2 cups biscuit mix
  • 1/2 cup milk
  • 3/4 cup ham chopped
Instructions
  1. Mix all ingredients together & beat one minute.

  2. Grease muffin tins & fill 2/3 full.

  3. Bake 15 minutes in a preheated 400-degree oven.


Enjoy!

Up Next:

Panda Express Orange Chicken

Be sure to Follow Foodgasm Recipes on Pinterest for more great recipes!

Recipe based on one by iewe
Photo by luvinlif2k

Strawberry Cream Cheese Bread

This Strawberry Cream Cheese Bread is probably the best quick bread recipe I’ve ever made! My whole family loves it.

If you love strawberries, try this recipe. Awesome flavors!!! A rich creamy texture to enjoy.

Be sure to Follow Foodgasm Recipes on Pinterest for more great recipes!

Strawberry Cream Cheese Bread
Ingredients
  • 1/2 cup butter softened
  • 1 cup sugar
  • 1 3 ounce cream cheese, softened
  • 2 eggs
  • 1 teaspoon vanilla extract
  • 2 cups flour
  • 2 teaspoons baking powder
  • 1/2 teaspoon baking soda
  • 1/2 teaspoon salt
  • 1/2 cup milk half 'n half
  • 1 1/2 cups strawberries chopped
  • 1/2 cup finely chopped pecans optional
Instructions
  1. With and electric mixer cream the butter, sugar and cream cheese until fluffy. Add the eggs one at a time. Mix in the vanilla.
  2. In separate bowl, mix the flour, baking powder, baking soda and salt. Blend the flour mixture with the butter mixture just until blended. Add half 'n half and only stir just to blend -- do not overstir!
  3. Drain the strawberries and blot dry. Carefully just fold in the strawberries and nuts. The dough mixture will be thick.
  4. Grease and flour a 9x5 inch loaf pan. Bake in a 350 degree oven for 50 to 60 minutes. Let the bread mellow for one day and then serve.


Enjoy!

Up Next:

Rachael Ray’s French Bread Pizza Rustica

Be sure to Follow Foodgasm Recipes on Pinterest for more great recipes!

Recipe based on one by and photo by Seasoned Cook

Orange Cinnamon Biscuits – Wonderful Combination

These Orange Cinnamon Biscuits make up in no time and they smell so good while baking. The flavor of the orange and cinnamon are a perfect combination.


This is a variation of My New Go-To Cinnamon Biscuits and they are not really like a biscuit at all, but more of an orangy cinnamon roll.

Be sure to Like Foodgasm Recipes on Facebook and Foodgasm on Pinterest for more great recipes.

Orange Cinnamon Biscuits
Prep Time
35 mins
Cook Time
20 mins
Cooling
10 mins
Total Time
1 hr 5 mins
 

These Orange Cinnamon Biscuits have perfect combination of orange and cinnamon!

Course: Dessert
Cuisine: American
Keyword: Orange Cinnamon Biscuits
Servings: 6
Calories: 425 kcal
Ingredients
  • 2 cups flour
  • 1 tablespoon baking powder
  • 1 teaspoon salt
  • 1/4 cup shortening
  • 3/4 cup milk
  • 2 -3 teaspoons orange zest divided
  • 1/4 cup butter melted (or very soft)
  • 1/2 cup sugar
  • 1 teaspoon cinnamon
Glaze
  • 1 cup powdered sugar
  • 1 -2 tablespoons orange juice
  • 1 teaspoon orange zest
Instructions
  1. Combine the flour, baking powder and salt; cut in shortening.
  2. Add 1-2 teaspoons orange zest to milk, stir.
  3. Stir the milk mixture into the flour mixture with a fork just until dough leaves sides of the bowl, the dough might be slightly sticky.
  4. Roll the dough out, on a lightly floured surface, into a 1/4 inch thick rectangle. Brush the top with butter (I prefer to use soft butter and spread it).
  5. Combine 1 teaspoon orange zest and sugar, stir to distribute the zest, mix in the cinnamon; sprinkle evenly over dough.
  6. Roll up, starting on the long side. Cut into 1/2 inch thick rounds.
  7. Place the rounds, with sides just touching, in greased 9" round pan.
  8. Bake at 425°F for 18-20 minutes or until golden brown.
  9. Remove from the oven, cool for about 10 minutes and drizzle with glaze, serve warm.


Enjoy!

Up Next:

Tabasco Cheddar Biscuits

Be sure to Follow Foodgasm Recipes on Pinterest for more great recipes!

Recipe based on one by and photo by Marg (CaymanDesigns)

Carb-Free Cloud Bread

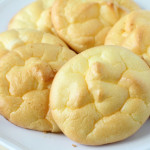
This Carb-Free Cloud Bread is a delicious home-made bread replacement that is practically carb free and very high in protein. They are just like heaven so they are called clouds.

Carb-Free Cloud Bread

I was very skeptical when I first read this recipe, but it came out well and tasted great.

With some imagination, you can do a lot with these little clouds and feel like you are enjoying your favorite sandwich.

Be sure follow Foodgasm Recipes on Pinterest for more great recipes.

Carb-Free Cloud Bread
Prep Time
30 mins
Cook Time
30 mins
Total Time
1 hr
 

This Carb-Free Cloud Bread is perfect as a bread substitute for anyone watching their carb intake! 

Course: Sandwiches
Cuisine: American
Keyword: Carb-Free Cloud Bread
Servings: 4
Calories: 185 kcal
Ingredients
  • 3 eggs separated
  • 3 tablespoons whole milk cottage cheese or 3 tablespoons cream cheese
  • 1/4 teaspoon cream of tartar
  • 1 1 g packet artificial sweetener
Instructions
  1. Preheat oven to 300 degrees.
  2. Separate the eggs very carefully, there must be no yolk in the white.
  3. In one bowl, mix together the egg yolks, the 3 T. of Cottage Cheese OR Cream Cheese and the one packet of Sweetener until smooth.
  4. In the other bowl add 1/4 teaspoon of Cream of Tartar to the whites and beat the whites on high speed until they are fluffy and form nice peaks.
  5. Very carefully fold the egg yolk mixture into the egg whites until mixed, but try and not break down the fluffiness of the egg whites too much.
  6. Spray two cookie sheets with Pam or other fat-free cooking spray.
  7. With a large spoon, "scoop" the mixture into 10 even rounds on the sheets (about the size of the top-half of the McDonalds hamburger bun; roughly 3/4 inch thick and 4 to 5 inches across).
  8. Bake on the middle rack. Here is when you have to watch them, because the cooking time is not the same on any two batches. It is somewhere around 1/2 hour, but it could be less or more. You just need to watch them until them become nice and golden brown (again, the color of a McDonalds bun).
  9. Remove from the pans and cool on a rack or cutting board.
  10. While warm they are crumbly and similar to cooked meringue - but don't let this fool you! Once completely cool, seal them in a ziplock storage baggie or a tupperware over night. They will totally change their consistency, to something much more like bread - a softer texture that is nice and chewy. If you do not like softer chewy bread, then eat them as they are, nice and crisp.
  11. Since the sides that were facing the pan are perfectly flat, you use these to spread things on, or make sandwiches, or even as a burger bun! The choice is up to you, and you will be quite amazed at how much like a bun these really are!

Be sure follow Foodgasm Recipes on Pinterest for more great recipes.

Recipe by Gillian Spence
Photo by Chef 0