Panda Express Orange Chicken

This Panda Express Orange Chicken is a copycat recipe. The chicken is tangy and oh so flavorful. It comes out crispy and just the way I like it…


This is a regular Chinese dish I make.

I did double the sauce, and since I looooooooooove orange anything, I not only zested the orange but peeled it and chopped up the sections to add to the sauce.

Give it a try! I’m sure you and your family will enjoy it.

Be sure to Follow Foodgasm Recipes on Pinterest for more great recipes!

Panda Express Orange Chicken
Prep Time
20 mins
Cook Time
15 mins
Total Time
35 mins
 

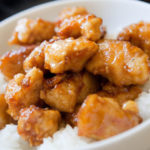
I love Panda Express and this Orange Chicken is an excellent copycat of their recipe.

Course: Main Course
Cuisine: Oriental
Keyword: Panda Express Orange Chicken
Servings: 6
Calories: 395 kcal
Ingredients
  • 2 lbs boneless skinless chicken chopped into bite sized pieces
  • 1 egg
  • 1 1/2 teaspoons salt
  • white pepper
  • oil for frying
  • 1/4 cup cornstarch plus
  • 1 tablespoon cornstarch
  • 1/4 cup flour
Orange Sauce
  • 1 tablespoon ginger root minced
  • 1 teaspoon garlic minced
  • 1/2 teaspoon red chili pepper flakes
  • 1/4 cup green onion chopped
  • 1 tablespoon rice wine
  • 1/4 cup water
  • 1/2 teaspoon sesame oil
  • 1 1/2 tablespoons soy sauce
  • 1 1/2 tablespoons water
  • 5 tablespoons sugar
  • 5 tablespoons white vinegar
  • 1 orange zest of
Instructions
  1. Place the chicken pieces in a large bowl, set aside.

  2. In a medium bowl stir the egg, salt, pepper, and 1 tablespoon oil and mix well, set aside.

  3. In a medium bowl stir together 1/2 cup of the cornstarch and the flour.

  4. Coat the chicken pieces with the egg mixture, then add to flour mixture, stirring to coat.

  5. Heat oil for deep-frying in wok or deep-fryer to 375 degrees. Add the chicken, small batches at a time, and fry 3 to 4 minutes or until golden crisp. (Do not overcook chicken).

  6. Remove chicken from the oil with a slotted spoon and drain on paper towels; set aside.

  7. Clean the wok and heat 15 seconds over high heat.

  8. Add 1 tablespoon oil. Add the ginger and garlic and stir-fry until fragrant; about 10 seconds. Add and stir-fry the crushed chiles and green onions. Add the rice wine and stir 3 seconds. Add the Orange Sauce and bring to boil.

  9. Add the cooked chicken, stirring until well mixed. Stir water into the remaining 1 tablespoon cornstarch until smooth and add to the chicken. Heat until sauce is thickened.

  10. Stir in the sesame oil and orange zest if desired. Serve over jasmine rice.


Enjoy this recipe for Panda Express Orange Chicken!

Up Next:

Paula Deen’s Chicken Alfredo With Crispy Bacon

Be sure to Follow Foodgasm Recipes on Pinterest for more great recipes!

Recipe based on one by flume027
Photo by Chef #1122263

Ham and Cheese Muffins – Super Quick and Easy

These ham and cheese muffins are super easy to throw together and they’re so super yummy. They’re good for breakfast or lunch or a light dinner, with soup.


I like to use sharp cheddar. A nice change from the usual sweet breakfast muffin!

Make these for breakfast some morning. A meal All-In-One and so simple and easy to make.

Be sure to Follow Foodgasm Recipes on Pinterest for more great recipes!

Ham and Cheese Muffins
Prep Time
10 mins
Cook Time
15 mins
Total Time
25 mins
 

These Ham and Cheese Muffins are a great grab and go breakfast!

Course: Breakfast
Cuisine: American
Keyword: Ham and Cheese Muffins
Servings: 6
Calories: 325 kcal
Ingredients
  • 1 cup cheese grated (your favorite)
  • 2 tablespoons sugar
  • 1 egg
  • 2 cups biscuit mix
  • 1/2 cup milk
  • 3/4 cup ham chopped
Instructions
  1. Mix all ingredients together & beat one minute.

  2. Grease muffin tins & fill 2/3 full.

  3. Bake 15 minutes in a preheated 400-degree oven.


Enjoy!

Up Next:

Panda Express Orange Chicken

Be sure to Follow Foodgasm Recipes on Pinterest for more great recipes!

Recipe based on one by iewe
Photo by luvinlif2k

Paula’s Mexican Rice – Very easy To Make

Paula’s Mexican Rice is a really easy to prepare side dish. It’s a meatless rice dish and that’s the reason I like to serve it alongside Super Tasty Lite Mexican Chicken Casserole.


It is very good and fairly spicy but not overly so.

A link to the Mexican Chicken Casserole is at the bottom of this recipe!

Be sure to Follow Foodgasm Recipes on Pinterest for more great recipes!

Paula's Mexican Rice
Prep Time
10 mins
Cook Time
20 mins
Total Time
30 mins
 

A very easy to prepare side dish for your Mexican dinner night.

Course: Side Dish
Cuisine: Mexican
Keyword: Paula's Mexican Rice
Servings: 4
Calories: 365 kcal
Ingredients
  • 1 teaspoon butter
  • 1 medium onion
  • 1/4 cup celery
  • 1 cup water
  • 1/2 teaspoon salt
  • 1 teaspoon chili powder
  • 1/2 teaspoon cumin
  • 3/4 cup dry rice
  • 1 10 ounce can hot Rotel Tomatoes
  • 2 teaspoons sugar
  • 1/2 teaspoon Worcestershire sauce
  • 1 cup cheese
Instructions
  1. Sauté onion, butter, celery.

  2. Add all other ingredients (except cheese); bring to boil, reduce, cover, and cook until liquid is absorbed about 20 minutes.

  3. Transfer to serving dish and add cheese.


Enjoy Paula’s Mexican Rice!

Up Next: 

Lite Mexican Chicken Casserole – Super Tasty

Be sure to Follow Foodgasm Recipes on Pinterest for more great recipes!

Recipe Based on one by paula giles
Photo by Marsha D.

Lite Mexican Chicken Casserole – Super Tasty

This Lite Mexican Chicken Casserole is one of my most requested “chicken stuff” recipes. Most of my friends don’t even know that it’s a light version.


I usually serve with a mixed green salad and a meatless version of Mexican rice. This is great leftover cold or hot!

A link to the Mexican Rice recipe is at the bottom of this recipe.

This is amazing, it totally rocks! Cheese, spice, and crunch, what more can you ask for? A super tasty dish that I will make many more times.

Be sure to Like Foodgasm Recipes on Facebook and Foodgasm on Pinterest for more great recipes.

Super Tasty Lite Mexican Chicken Casserole
Prep Time
15 mins
Cook Time
50 mins
Total Time
1 hr 5 mins
 

Really easy to make and tastes great!

Course: Main Course
Cuisine: Mexican
Keyword: Lite Chicken Chicken Casserole
Servings: 6
Calories: 395 kcal
Ingredients
  • 1 cup reduced-sodium fat-free chicken broth
  • 2 4 1/2 ounce cans canned diced green chiles, divided
  • 1 3/4 pounds boneless skinless chicken breasts
  • 2 teaspoons olive oil
  • 1 cup chopped onion
  • 1 cup evaporated skim milk
  • 1 cup shredded monterey jack cheese
  • 1/4 cup tub-style light cream cheese
  • 1 10 ounce can enchilada sauce
  • 12 6 inch corn tortillas
  • 1/4 cup shredded extra-sharp reduced-fat cheddar cheese
  • 1 ounce tortilla chips crushed
  • cooking spray
Instructions
  1. Preheat oven to 350 degrees.
  2. Bring the broth and 1 can of chiles to a boil in a large skillet. Add the chicken, reduce the heat and simmer for about 15 minutes or until chicken is done turning once. Remove the chicken to a plate and reserve the cooking liquid for later. Allow chicken to cool and shred meat.

  3. Saute 1 can of chiles and onion in heated olive oil for 3 minutes or until soft. Add the reserved liquid, enchilada sauce, milk, cream cheese, Monterey Jack, and stir well. Stir in shredded chicken, cook for 2 minutes. Remove from heat.

  4. Coat a 2-quart casserole with cooking spray and place 4 tortillas in the bottom. Spread 2 cups of chicken mixture over tortillas. Repeat layers twice ending up with the chicken mixture on top. Top with crushed tortillas and cheddar cheese.

  5. Bake at 350 degrees for 30 minutes or until thoroughly heated. Let stand for at least 10 minutes before serving.


Enjoy!

Up Next:

Chicken Spaghetti Casserole

Be sure to Like Foodgasm Recipes on Facebook and Foodgasm on Pinterest for more great recipes.

Recipe based on one by ~*Sue*~Chef
Photo by ~Leslie~

Balsamic Glazed Chicken and Veggies

I have made this balsamic glazed chicken and veggies meal a couple of times, and it is quite tasty. I love the flavor of the sauce.


I also love that there is asparagus in it. Asparagus is one of my favorite veggies.

I have also tried this recipe with green beans and carrots and it’s pretty good too. I tend to prefer it with the asparagus, but this is a completely customizable recipe.

Put in what you like. Don’t put in what you don’t like. This delicious meal is ready in less than 45 minutes!

Delicious, simple, and healthy! You can’t beat it.

Be sure to Follow Foodgasm Recipes on Pinterest for more great recipes!

Balsamic Glazed Chicken and Veggies
Prep Time
30 mins
Cook Time
15 mins
Total Time
45 mins
 

Balsamic Glazed Chicken and Veggies is quick to prepare and delicious!

Course: Main Course
Cuisine: American
Keyword: Balsamic Glazed Chicken and Veggies
Servings: 6
Calories: 385 kcal
Ingredients
  • 1/4 cup + 2 Tbsp Italian salad dressing
  • 3 Tbsp balsamic vinegar
  • 1 1/2 Tbsp honey
  • 1/8 tsp crushed red pepper flakes more or less to taste
  • 1 1/4 lbs chicken breast tenderloins
  • 2 Tbsp olive oil
  • Salt and freshly ground black pepper
  • 1 lb fresh asparagus trimmed of tough ends, chopped into 2-inch pieces
  • 1 1/2 cups matchstick carrots
  • 1 cup grape tomatoes halved
Instructions
  1. In a mixing bowl whisk together salad dressing, balsamic vinegar, honey and red pepper flakes, set aside.
  2. Heat olive oil in a 12-inch skillet over medium-high heat. Season chicken with salt and pepper to taste, then place chicken evenly in skillet. Cook about 6 – 7 minutes, rotating once halfway through cooking, until chicken has cooked through (meanwhile, chop asparagus and tomatoes).
  3. Add half the dressing mixture to skillet and rotate chicken to evenly coat. Transfer chicken to a large plate or a serving platter while leaving sauce in skillet.
  4. Add asparagus and carrots to skillet, season with salt and pepper to taste and cook, stirring frequently, until crisp-tender, about 4 minutes. Transfer veggies to plate or platter with chicken.
  5. Add remaining dressing mixture to skillet and cook, stirring constantly, until thickened, about 1 minute.
  6. Add tomatoes to chicken and veggies and drizzle dressing mixture in pan over top (or return chicken and veggies to the pan and toss to coat).


Enjoy Balsamic Glazed Chicken and Veggies!

Up Next:

Sweet and Sour Chicken Recipe

Be sure to Follow Foodgasm Recipes on Pinterest for more great recipes!

WE BET YOU’VE NEVER MADE HARD BOILED EGGS LIKE THIS BEFORE

Hard-cooked-eggs

There are a ton of ways to enjoy your morning protein and having them made this way was really interesting. I would have never thought to make my eggs this way ever.

Now, you would think that they would taste the same after being cooked this way right? Well…. you are wrong!

When you make your eggs using this new method they taste a lot better and clean-up is a heck of a lot easier surprisingly.

You are going to flip when you see this! The best part is that all you have to do is throw them in and then they’re done!

If you didn’t think there was an easier way to get hard boiled eggs well, there is and it means putting them in the oven.

Be sure to Like Foodgasm Recipes on Facebook and Foodgasm on Pinterest for more great recipes.

Step By Step Directions To Follow

Preheat the oven to 325 degrees or 350 if your oven runs cooler

Place eggs individually in a mini muffin tin and cook them for 30 minutes, then place them in cool water for about 10 minutes.

Finished!

Baking them in the oven actually has the eggs come out a little creamier than if you were to hard-boil them in water. This is the best way to make eggs if you need them in bulk and they will cook perfectly all throughout.

Enjoy!

Be sure to Like Foodgasm Recipes on Facebook and Foodgasm on Pinterest for more great recipes.

Loaded Cheese Stuffed Mashed Potato Balls

Be sure to Like Foodgasm Recipes on Facebook and Foodgasm on Pinterest for more great recipes.

Capture

Watch the video!


Just when you thought you couldn’t eat mashed potatoes on the go!

Loaded Cheese Stuffed Mashed Potato Balls

Ingredients

4 Cups Leftover/Cold Mashed Potatoes – prepared to your liking
1/2 Cup Sliced Green Onions
3/4 Cup Chopped Cooked Bacon
1 tsp Garlic Powder
1/2 tsp Black Pepper
2 Eggs
Block of Cheddar Cheese – Cut into small cubes
1 Cup Flour
1 Cup Bread Crumbs
Oil for frying
Salt

Directions

Place cold mashed potatoes into a large mixing bowl. Add Green Onion, Chopped Bacon, Garlic Powder, Black Pepper, and 1 egg – mix well.

With lightly floured hands – pick up a tablespoon sized ball of potato mixture and flatten into a small pancake. Place cube of Cheddar in the center and wrap the potato mixture around the cheese. Repeat.

In three separate bowls, add Flour, Bread Crumbs, and remaining egg (whisked). Coat the potato ball in flour, then egg, then bread crumbs. Coat once more with egg and once more with bread crumbs. Set aside – store in fridge while you wait to fry.

In a medium pan heat oil over medium/high heat (to approximately 350˚F). Fry the potatoes in batches until browned on all sides. Transfer fried potato balls to paper towels to drain excess oil. Sprinkle with salt. Once all potatoes are fried – transfer to a baking tray and bake in a preheated oven for 5 minutes at 400˚F (200˚C). Enjoy!

Be sure to Like Foodgasm Recipes on Facebook and Foodgasm on Pinterest for more great recipes.

Savory Oven French Fries With A Secret Ingredient

Oh, these Savory Oven French Fries are so simple and good! Why buy the frozen ones when fresh ones are so cheap and easy? Very tasty!


I don’t peel my potatoes, and I try and get them nice and crispy on the outside!

The secret is the Italian seasonings, and sometimes I sprinkle on some Parmesan cheese.

The salad dressing mix gives them a savory flavor. Enjoy!

Be sure to Follow Foodgasm Recipes on Pinterest for more great recipes!

Savory Oven French Fries
Prep Time
15 mins
Cook Time
30 mins
Total Time
45 mins
 

It's the salad dressing mix that makes these oven fries so good!

Course: Side Dish
Cuisine: American
Keyword: Savory Oven French Fries
Servings: 6
Calories: 395 kcal
Ingredients
  • 6 medium potatoes
  • 1 ounce Good Seasons Italian dressing not mixed
  • 2 tablespoons oil
  • 1 tablespoon fresh parsley Chopped
Instructions
  1. Preheat oven to 350F.

  2. Peel the potatoes and slice for French fries. Lay the potatoes out on a paper towel, pat dry. Potatoes should be as dry as possible.

  3. Put potatoes in a large bowl and drizzle with oil, tossing to coat evenly.

  4. Lay in a single layer on a large baking sheet; sprinkle with the dry dressing mix and parsley.

  5. Bake 25 min, then flip over only once. Return to the oven and increase the temperature to 450F. Cook 3 to 5 min longer until potatoes are tender and start to brown.


Enjoy these Savory Oven French Fries!

Up next:

Pesto Pasta Salad Recipe

Be sure to Follow Foodgasm Recipes on Pinterest for more great recipes!

Recipe based on one by Loves2Teach
Photo by lazyme

Homemade Ranch Dressing – Easy To Make

I love ranch dressing and this Homemade Ranch Dressing recipe is so easy and tastes much better than the bottled stuff!


I usually have all the ingredients on hand, so it’s easy to whip it up when I need a dressing.

It tastes better when you chill it overnight. The flavors have a chance to mingle and it firms up nicely!

Love this stuff on raw broccoli, mushrooms, and celery.

Be sure to Follow Foodgasm Recipes on Pinterest for more great recipes!

Homemade Ranch Dressing
Prep Time
15 mins
Cook Time
0 mins
Total Time
15 mins
 

Homemade Ranch Dressing is really worth the effort. Much better than store bought.

Course: Salad
Cuisine: American
Keyword: Homemade Ranch Dressing
Servings: 8
Calories: 235 kcal
Ingredients
  • 1 1/2 cups mayonnaise
  • 1/2 cup sour cream
  • 1/4 cup heavy cream
  • 2 tablespoons lemon juice
  • 1/2 teaspoon garlic powder
  • 1/2 teaspoon dried dill weed
Instructions
  1. Place all the ingredients in a blender or food processor, blitz on high speed for 2 minutes. The mixture will look runny, but it will thicken as it chills.
Recipe Notes

Store in an airtight container in refrigerator for up to two weeks.

Enjoy this Homemade Ranch Dressing!

Up Next: 

Chunky Homemade Blue Cheese Salad Dressing

Be sure to Follow Foodgasm Recipes on Pinterest for more great recipes!

Recipe based on one by Mirj
Photo by CountryLady

Buffalo Sauce Blue Cheese Burgers

These Buffalo Sauce Blue Cheese Burgers are delicious! I like to double the hot sauce to give them even more spice. I like them with even more blue cheese crumbled on top.


Buffalo sauce is a mixture of melted butter and hot sauce. It’s a big claim to food fame for Buffalo, New York.

It’s normally served on fried chicken wings (Buffalo wings), but this burger is a great variation of the theme.

Be sure to Follow Foodgasm Recipes on Pinterest for more great recipes!

Buffalo Sauce Blue Cheese Burgers
Prep Time
25 mins
Cook Time
15 mins
Total Time
40 mins
 

These Buffalo Sauce Blue Cheese Burgers are a favorite when I fire up the grill.

Course: Main Course
Cuisine: American
Keyword: Buffalo Sauce Blue Cheese Burgers
Servings: 6
Calories: 345 kcal
Ingredients
  • 4 tablespoons butter cut in small pieces
  • 1/3 cup hot sauce
  • 1/2 cup finely crumbled blue cheese
  • 1 tablespoon minced garlic
  • 2 lbs 85% lean ground beef or 2 lbs ground buffalo meat
  • 1/2 teaspoon celery seed
  • 1/3 cup finely chopped onion
  • 6 hamburger buns split
Instructions
  1. Melt the butter and whisk in the hot sauce.
  2. Mix the blue cheese and garlic in a small bowl.
  3. Using your hands, gently mix the ground beef, celery seed, onion and 1/4 cup hot sauce mixture in a medium bowl until blended. Form into 12 patties, using a light touch; the patties should be about 4 1/2 inches in diameter and no more than 1/2 inch thick.
  4. Spoon about 2 teaspoons of the cheese-garlic mixture in the center of 6 patties, then top with remaining patties and press together, sealing edges.
  5. Cover and refrigerate until ready to grill. (Even if you aren't making these ahead of time, I think they hold together better after a little chill time).
  6. Heat grill to medium and oil grate.
  7. Grill burgers about 4-5 minutes on each side, or until cooked to taste. Brush with the remaining hot sauce mixture during last 2 minutes of cooking. Toast buns if you like.


Enjoy these Buffalo Sauce Blue Cheese Burgers!

Up Next: 

Chunky Homemade Blue Cheese Salad Dressing

Be sure to Follow Foodgasm Recipes on Pinterest for more great recipes!

Recipe based on one by and photo by GaylaJ